Saturday, 27 February 2016

Comparing Angular 1 and Angular 2 Side by Side

Comparing Component and Controller

Angular 2

The Component

Controllers are a big part of Angular 1 that is going away in Angular 2. In Angular 2 you will probably write all your controllers as components.


  import {Component} from 'angular2/core'

  @Component({
    selector: 'my-app',
    providers: [],
    template: `
      <div>
        <h2>Hello {{name}}</h2>
      </div>
    `,
    directives: []
  })
  export class App {
    constructor() {
      this.name = 'Angular2'
    }
  }
                

    <my-app>
      loading...
    </my-app>
                

Angular 1

The Controller


var app = angular.module('app', []);

app.controller('MainCtrl', function($scope) {
  $scope.name = 'Hello Angular1';
});
                

  <body ng-controller="MainCtrl">
    <h2>{{name}}</h2>
  </body>
              

Structural Directives

Angular 2

*ngFor, *ngIf


    <ul>
      <li *ngFor="#ball of balls">
        {{ball.name}}
      </li>
    </ul>
    <div *ngIf="balls.length">
      <h3>You have {{balls.length}} balls</h3>
    </div>
            

Angular 1

ng-repeat, ng-if


    <ul>
      <li ng-repeat="ball in balls">
        {{ball.name}}
      </li>
    </ul>
    <div ng-if="balls.length">
      <h3>You have {{balls.length}} ball </h3>
    </div>
                

Two-Way Data Binding

Angular 2

[(ngModel)]='value'


    <input [(ngModel)]="me.name">
            

Angular 1

ng-model='value'


    <input ng-model="me.name">
                

Property Binding

Angular 2

[Property]='Property'


    <div [style.visibility]="tools ? 'visible' : 'hidden'">
      <img [src]="imagePath">
      <a [href]="link">{{tools}}</a>
    </div>
            

Angular 1

ng-property='Property'


    <div ng-style="tools ? {visibility: 'visible'}: {visibility: 'hidden'}">
        <img ng-src="{{tools}}">
        <a ng-href="{{tools}}">
          {{tools}}
        </a>
    </div>
                

Event Binding

Angular 2

(event)='action()'


    <input
      (blur)="log('blur')"
      (focus)="log('focus')"
      (keydown)="log('keydown', $event)"
      (keyup)="log('keyup', $event)"
      (keypress)="log('keypress', $event)"
      >
                

Angular 1

ng-event='action()'


        <input
          ng-blur="log('blur')"
          ng-focus="log('focus')"
          ng-keydown="log('keydown', $event)"
          ng-keyup="log('keyup', $event)"
          ng-keypress="log('keypress', $event)"
          >
            

Services and DI

Angular 2

Injectable Service

In Angular 1 we use services by using any one of Factory, Services, Providers, Constants, Values which all are covered under a provider.

But in Angular 2 all this are consolidated into one base Class.


  import {Injectable} from 'angular2/core';
  
  @Injectable()
  export class StudentService {
    getStudents = () => [
      { id: 1, name: 'Nisar' },
      { id: 2, name: 'Sonu' },
      { id: 3, name: 'Ram' }
    ];
  }
            

Using same service in Component


  import { Component } from 'angular2/core';
  import { StudentService } from './student.service';
  
  @Component({
    selector: 'my-students',
    templateUrl: 'app/student.component.html',
    providers: [StudentService]
  })
  export class StudentsComponent {
    constructor(
      private _StudentService: StudentService) { }
    students = this._StudentService.getStudents();
  }
            

Angular 1

Service


  (function () {
    angular
      .module('app')
      .service('StudentService', StudentService);

    function StudentService() {
      this.getStudents = function () {
        return [
          { id: 1, name: 'X-Wing Fighter' },
          { id: 2, name: 'Tie Fighter' },
          { id: 3, name: 'Y-Wing Fighter' }
        ];
      }
    }
  })();
            

Using same service in Controller


  (function () {
    angular
      .module('app', [])
      .controller('StdController', StudentsController);
  
    StudentsController.$inject = ['StudentService'];
    function StdController(StudentService) {
      var std = this;
      std.title = 'Services';
      std.Students = StudentService.getStudents();
    }
  })();
            

Wednesday, 24 February 2016

SASS Cheat Sheet


Nesting

SCSS

 h1
 {
   color: blue;
   span
   {
     color: gray;
   }
 }
                

CSS

 h1 {
   color: blue;
 }
 h1 span {
   color: gray;
 }
                

Parent selector

SCSS

input{
  border-color: gray;
  &:focus
  {
    border-color: orange;
  }
}
       

CSS

  input {
  border-color: gray;
}
input:focus {
  border-color: orange;
}
                

Parent selector

SCSS

.advert button
{
  font-size: 100%;
  .billboard @
  {
    font-size: 200%;
  }
}
                

CSS

.advert button {
  font-size: 100%;
}
.billboard .advert button {
  font-size: 200%;
}
             

$ variables

SCSS

                  
$color-main: rgb( 240, 139, 29 );
$color-accent: rgb( 141, 198, 63 );
h1
{
  color: $color-main;
  span
  {
    color: $color-accent;
  }
}
               

CSS

h1 {
  color: #f08b1d;
}
h1
span {
  color: #8dc63f;
}
               

Color helpers

SCSS

$main-color: rgb( 240, 139, 29 );
$main-color-light: lighten( $main-color, 30% );
$main-color-dark: darken( $main-color, 30% );
h1
{
  color: $color-main;
  span
  {
    color: $main-color-light;
  }
  span
  {
   color: $main-color-dark;
  }
}
               

CSS

 
h1 {
  color: #f08b1d;
}
h1
span {
  color: #fad5ac;
}
h1
span {
  color: #6d3c07;
}
               

@mixin and @include

SCSS

@mixin section-style
{
  background-color: white;
  border-radius: 4px;
  box-shadow: 0 1px 3px rgba( 0, 0, 0, .7 );
}
div
{
  @include section-style;
  color:#rgb( 51, 51, 51 );
}
               

CSS

 div {
 background-color: white;
 border-radius: 4px;
 box-shadow: 0 1px 3px rgba( 0, 0, 0, .7 );
 color:#rgb( 51, 51, 51 );
 }
               

Mixin variables

SCSS

@mixin border-radius( $radius )
{
  -webkit-border-radius: $radius;
     -moz-border-radius: $radius;
          border-radius: $radius;
}
div
{
  @include border-radius( 4px );
}
               

CSS

 div {
  -webkit-border-radius: 4px;
  -moz-border-radius: 4px;
  border-radius: 4px;
}
               

Mixin variable defaults

SCSS

 @mixin border-radius( $radius:10px )
{
  -webkit-border-radius: $radius;
     -moz-border-radius: $radius;
          border-radius: $radius;
}
div
{
  @include border-radius( 4px );
}
section
{
  // no value here so default will be applied
  @include border-radius; 
}
               

CSS

div {
  -webkit-border-radius: 4px;
     -moz-border-radius: 4px;
          border-radius: 4px;
}
section {
  -webkit-border-radius: 10px;
     -moz-border-radius: 10px;
          border-radius: 10px;
}
               

Mixins multiple variables

SCSS

@mixin box-shadow( $x:0, $y:0, $blur:4px, $spread:0, $color:black )
{
  -webkit-box-shadow: $x $y $blur $spread $color;
     -moz-box-shadow: $x $y $blur $spread $color;
          box-shadow: $x $y $blur $spread $color;
}
div
{
  @include box-shadow( 0, 1, 10px, 0, rgba( 0, 0, 0, .7 ) );
}
section
{
  @include box-shadow( $blur:12px, $color:rgba( 0, 0, 0, .8 ) );
}
               

CSS

 div {
  -webkit-box-shadow: 0 1 10px 0 rgba(0, 0, 0, 0.7);
  -moz-box-shadow: 0 1 10px 0 rgba(0, 0, 0, 0.7);
  box-shadow: 0 1 10px 0 rgba(0, 0, 0, 0.7);
}
section {
  -webkit-box-shadow: 0 0 12px 0 rgba(0, 0, 0, 0.8);
  -moz-box-shadow: 0 0 12px 0 rgba(0, 0, 0, 0.8);
  box-shadow: 0 0 12px 0 rgba(0, 0, 0, 0.8);
}
               

Nested mixins

SCSS

@mixin border-radius( $radius:4px )
{
  -webkit-border-radius: $radius;
     -moz-border-radius: $radius;
          border-radius: $radius;
}
@mixin box-shadow( $x:0, $y:0, $blur:4px, $spread:0, $color:black )
{
  -webkit-box-shadow: $x $y $blur $spread $color;
     -moz-box-shadow: $x $y $blur $spread $color;
          box-shadow: $x $y $blur $spread $color;
}
@mixin div-style
{
  background-color:white;
  @include border-radius( 6px );
  @include box-shadow( $x:2, $blur:10px );
  color:rgb( 51, 51, 51 );
}
div
{
  @include div-style
}
               

CSS

div {
  background-color: white;
  -webkit-border-radius: 6px;
  -moz-border-radius: 6px;
  border-radius: 6px;
  -webkit-box-shadow: 2 0 10px 0 black;
  -moz-box-shadow: 2 0 10px 0 black;
  box-shadow: 2 0 10px 0 black;
  color: #333333;
}
               

@extend

SCSS

                    
div
{
  background-color: white;
  border:1px solid gray;
  margin-bottom: 1rem;
}
section
{
  @extend div;
  color: rgb( 102, 102, 102 );
}
               

CSS

div, section {
  background-color: white;
  border:1px solid gray;
  margin-bottom: 1rem;
}
section {
  color: #666666;
}
               

Extending with %placeholders

SCSS

%default-text
{
  font: {
    size: 100%;
    family: Georgia, "Times New Roman", serif;
    weight: normal;
  }
  line-height: 1.3;
  color: rgb( 51, 51, 51 );
}
div
{
  @extend %default-text;
}
section
{
  @extend %default-text;
}
header
{
  @extend %default-text;
}
aside
{
  @extend %default-text;
}
               

CSS

                    
div, section, header ,aside {
  font-size: 100%;
  font-family: Georgia, "Times New Roman", serif;
  font-weight: normal;
  line-height: 1.3;
  color: rgb( 51, 51, 51 );
}
               

Nesting namespaced

SCSS

h1
{
  font:
  {
    family: Georgia, "Times New Roman", serif;
    size: 137.5%;
    weight: thin;
  }
  color: blue;
}
               

CSS

h1 {
  font-family: Georgia, "Times New Roman", serif;
  font-size: 137.5%;
  font-weight :thin;
  color: blue;
}
               

Expanded

SCSS

 sass --watch --style expanded style.scss:style.css
               

CSS

ul {
  display: inline-block;
}
ul li {
  list-style: none;
  color: rgb(51,51,51);
}
               

Compact

SCSS

 sass --watch --style compact style.scss:style.css
               

CSS

ul { display: inline-block; }
ul li { list-style: none; color: rgb(51,51,51); }
               

Compressed

SCSS

sass --watch --style compressed style.scss:style.css
               

CSS

ul{display:inline-block;}ul li{list-style:none;color:rgb(51,51,51);}
               

Browser Sync with GULP


A JavaScript task runner has become a main stay for almost any new project. Some people think that runners like Grunt and Gulp are limited to only Node.js projects, but it's not so. Any project can benefit from a simple task runner. I’ve started using Gulp to do tasks in .Net projects. When it comes to building CSS and JavaScript, specifically, it’s bliss.

I want to share some tricks which will definetly make your's life easier. In this article i am going to explain how to use Browser Sync with gulp.

Install Packages

Initialize npm in your project


  npm init
 

Install following Package


  npm install -g gulp
 

  npm install gulp gulp-sass browser-sync --save-dev
 

Create File Structure

Create Gulpfile

Extras

You can download full source from my github

Sunday, 21 February 2016

Gulp with Sass

A JavaScript task runner has become a main stay for almost any new project. Some people think that runners like Grunt and Gulp are limited to only Node.js projects, but it's not so. Any project can benefit from a simple task runner. I’ve started using Gulp to do tasks in .Net projects. When it comes to building CSS and JavaScript, specifically, it’s bliss.

I want to share some tricks which will definetly make your's life easier. In this article i am going to explain how to use CSS Compilation for SASS.

Autoprefixer might be newer for use so let us have quick understanding

Autoprefixer parses CSS files and adds vendor prefixes to CSS rules using the Can I Use database to determine which prefixes are needed.

It's converts From
 a {
   transition: transform 1s
 }
To
 a {
   -webkit-transition: -webkit-transform 1s;
   transition: -ms-transform 1s;
   transition: transform 1s
 }

Install Packages

Initialize npm in your project


  npm init
 

Install following Package


  npm install -g gulp
 

  npm install gulp gulp-util gulp-sass gulp-autoprefixer del gulp-plumber  --save-dev
 

Create GulpConfig file

Create Gulpfile

Extras

You can download full source from my github

Saturday, 20 February 2016

ESLint using GULP


A JavaScript task runner has become a main stay for almost any new project. Some people think that runners like Grunt and Gulp are limited to only Node.js projects, but it's not so. Any project can benefit from a simple task runner. I’ve started using Gulp to do tasks in .Net projects. When it comes to building CSS and JavaScript, specifically, it’s bliss.

I want to share some tricks which will definetly make your's life easier. In this article i am going to explain how to use ESLint and find any error in javascript.

Install Packages

Initialize npm in your project


 npm init
 

Install following Package


 npm install -g gulp
 

 npm install gulp gulp-eslint gulp-util --save-dev
 

Create Gulp Config File

Create Gulpfile

Run Gulp

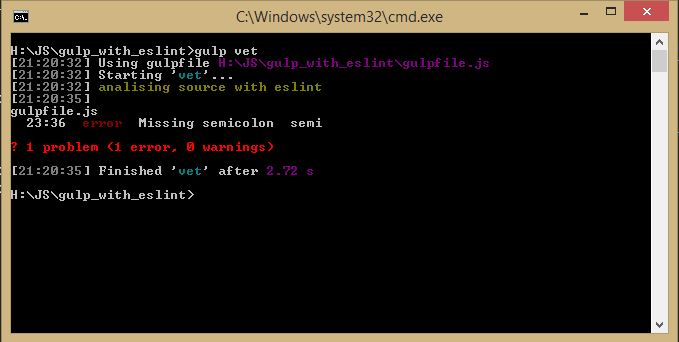
We can now do gulp vet from the command line to execute this task.

Extras

You can download full source from my github

Thursday, 18 February 2016

JSLint Vs JSHint Vs JSCS Vs ESLint


This are four tools work in the same basic way. They are use to analyze and report problems in JavaScript and helpful in debugging JavaScript.
JSLint JSHint JSCS ESLint
It's oldest. The downsides are that JSLint is not configurable or extensible. You can’t disable many features at all. JSHint was created as a more configurable version of JSLint (of which it is a fork). JSCS is a code style checker. This means it only catches issues related to code formatting, and not potential bugs or errors. ESLint is the most recent out of the four. It was designed to be easily extensible, comes with a large number of custom rules, and it’s easy to install more in the form of plugins.

My choice of these four is ESLint. Because it support ES6.

A linting tool is a good step towards catching problems, but it only sees as many errors as its rules permit. For a more foolproof automated bug-catcher, I recommend using unit tests. Code reviews can also be useful for this purpose.

How do you and your team ensure the quality of your code?

Sunday, 14 February 2016

Directives in angular 2

Directives are classes which get instantiated as a response to a particular DOM structure. We use Directives to break complex problems into smaller more reusable components.

There are three kinds of Angular directives:

  1. Components
  2. Attribute directives
  3. Structural directives

Component

The Component is really a directive with a template. It's the most common of the three directives and we write lots of them as we build our application.

Components are typically used to create UI widgets or to break up the application into smaller components.

Attribute directives

The Attribute directive changes the appearance or behavior of an element. The built-in NgStyle directive, for example, can change several element styles at the same time.

Structural directive

The Structural directive changes the DOM layout by adding and removing DOM elements. NgFor and NgIf are two familiar examples.

Saturday, 13 February 2016

MVC vs Angular


I am a greate fan of MVC but i think Angular and WebAPI is going to kill MVC.

One up side about MVC would be every thing can be done in one language: C# but that's not the winning point because "MVC [Required]..." cause, jQuery Validation is very kludgy, not performant at all, hard to attach validators to newly added dom elements, etc.

I personally prefer pure HTML views, an entirely angular front end along with a Web API/EF/SQL Server back end, basically no Razor. Razor is an abstraction to help programmers render HTML, these days everyone's coming to the conclusion that removing these abstractions is a better idea, hence the evolution of ASP.NET from web forms, to MVC etc. It's not really difficult for developers to get to grips with HTML and use an angular front end, moreover this makes UI designers jobs easier, they have pure HTML and JSON/Javascript, they don't need to go about understanding MVC, Razor, controllers and actions. We used to work completely on MVC, in our latest project we moved to a Web API back end and an angular front end, and we've noticed that our UI designer's productivity has vastly improved.

Razor is a horrible thing even among templating engines. You'll notice a drastic increase in productivity when using angular over any templating engine (Jade, handlebar, razor etc). Use a backend which serves JSONs (can be web-api, node-express or PHP) and a angular front end is a perfect match.

I think my next project would be in WebAPI + Angular will play well. Because API first with angular, iOS, Andriod all talking is the nice way to go. Everything is WebAPI now.

Angular 1 VS Angular 2


Angular 2 Angular 1
Performance With ultra fast change detection and immutable data structures, Angular 2 promises to be both faster and more memory efficient Angular 1 had some performance issue with a big applications.
Data binding By default Angular 2 has a uni-directional data flow, means one-way data binding. That doesn't mean you can't do two way data binding. Angular 2 support two way binding too Two-way data binding feature is default in Angular 1.
$scope Angular 2 finally kills it off, as properties are bound to components. $scope is the heart of controller in Angular 1.
UI Angular 2 adopted component-based UI like React do. Angular 1 depends on Controller and Directive for there UI.
New Base Language Angular 2 is written entirely in Typescript and meets the ECMAScript 6 specification. Angular 2 is written entirely in Javascript and meets the ECMAScript 5 specification.
Mobile Support Angular 2 was designed to be better and ready for any thing coming its way that is mobile oriented. Angular 1.x was not built with mobile support in mind, but fortunately frameworks like Ionic found favor in them.

Thanks for reading..

Final thing i want to say that...

Web Components are the future of the Web and if you are not planning to accept that yet, then you are driving on the wrong lane.

Why Does OAuth v2 Have Both Access Tokens and Refresh Tokens?

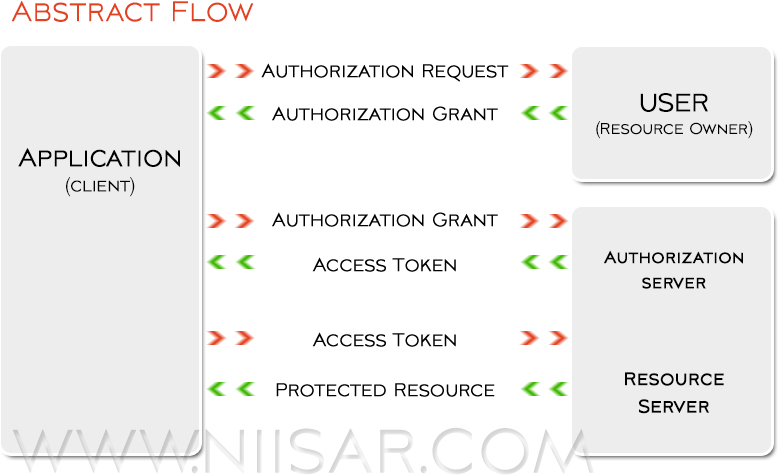
OAuth 2.0 protocol indicates that an authorization server can return both an access_token (which is used to authenticate oneself with a resource) as well as a refresh_token, which is used purely to create a new access_token:
But the question is why do we have both? Why not just make the access_token last as long as the refresh_token and not have a refresh_token! isn't it?

But going through google and stackoverflow i found nice answer that actually reason to use Refresh Token is do with claims.

Each token contains claims which can include anything from the users name, their roles or the provider which created the claim.

As a token is refreshed these claims are updated.

If we refresh the tokens more often we are obviously putting more strain on our identity services however we are getting more accurate and up-to-date claims.

Want to know more on OAuth 2.0 then click hear What is OAuth 2.

What is OAuth 2

OAuth 2 provides authorization flows for web and desktop applications, and mobile devices. It is an authorization framework that enables applications to obtain limited access or information to user accounts on an HTTP service.

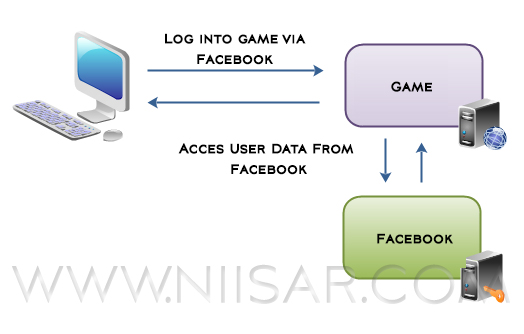
It is an open authorization protocol which enables applications to access each others data. For instance, a game application can access a users data in the Facebook application, or a location based application can access the user data of the Foursquare application etc.

We will now discuss OAuth 2's Role Types and Authorization grant types.

OAuth Roles

  • Resource Owner
  • Resource Server
  • Authorization Server
  • Client

Authorization Grant

The authorization grant type depends on the method used by the application to request authorization, and the grant types supported by the API. OAuth 2 have four grant types:

  • Authorization Code: used with server-side Applications
  • Implicit: used with Mobile Apps or Web Applications (applications that run on the user's device)
  • Resource Owner Password Credentials: used with trusted Applications, such as those owned by the service itself
  • Client Credentials:used with Applications API access

Now let's discuss the above following heads in more details.

OAuth Roles > Resource Owner(user)

The resource owner is the user who authorizes an application to access their account. The application's access to the user's account is limited to the "scope" of the authorization granted (e.g. read or write access).

OAuth Roles > Resource Server(API)

The resource server hosts the protected user accounts.

OAuth Roles > Authorization Server

The authorization server verifies the identity of the user then issues access tokens to the application.

From developer's point of view a service's API fulfills both the resource and authorization server roles.

OAuth Roles > Client

The client is the application that wants to access the user's account. Before it may do so, it must be authorized by the user, and the authorization must be validated by the API.

Authorization Grant > Authorization Code

The authorization code grant type is the most commonly used because it is optimized for server-side applications, where source code is not publicly exposed, and Client Secret confidentiality can be maintained. This is a redirection-based flow, which means that the application must be capable of interacting with the user-agent (i.e. the user's web browser) and receiving API authorization codes that are routed through the user-agent.

Authorization Grant > Implicit

The implicit grant type is used for mobile apps and web applications (i.e. applications that run in a web browser), where the client secret confidentiality is not guaranteed. The implicit grant type is also a redirection-based flow but the access token is given to the user-agent to forward to the application, so it may be exposed to the user and other applications on the user's device. Also, this flow does not authenticate the identity of the application, and relies on the redirect URI (that was registered with the service) to serve this purpose.

The implicit grant type does not support refresh tokens.

The implicit grant flow basically works as follows: the user is asked to authorize the application, then the authorization server passes the access token back to the user-agent, which passes it to the application. If you are curious about the details, read on.

Authorization Grant > Resource Owner Password Credentials

With the resource owner password credentials grant type, the user provides their service credentials (username and password) directly to the application, which uses the credentials to obtain an access token from the service. This grant type should only be enabled on the authorization server if other flows are not viable. Also, it should only be used if the application is trusted by the user (e.g. it is owned by the service, or the user's desktop OS).

Authorization Grant > Client Credentials

The application requests an access token by sending its credentials, its client ID and client secret, to the authorization server. An example POST request might look like:

   https://oauth.example.com/token?grant_type=client_credentials&client_id=CLIENT_ID&client_secret=CLIENT_SECRET
  

Friday, 12 February 2016

Token Based Authentication using Web Api 2, OWIN, Identity, AngularJS, RequireJS

So first lets us know what those technology are and why to use those specific technology for Authentication.

ASP.NET Web API is a framework that makes it easy to build HTTP services that reach a broad range of clients, including browsers and mobile devices. ASP.NET Web API is an ideal platform for building RESTful applications on the .NET Framework.

OWIN stands for Open Web Interface for .NET. It defines a standard interface between .NET web servers and web applications. Point to Note.. It is not a framework or tecnology.. It's just a Specification.

Identity The ASP.NET Identity system is designed to replace the previous ASP.NET Membership and Simple Membership systems. It includes profile support, OAuth Integration, works with OWIN, and is included with the ASP.NET templates whipped with VS 2013.

AngularJS is most popular SPA framework. It is most widely used SPA framework developed and maintained by Google.

RequireJS is actually a fork of the Common.js specification. It is most popular AMD(Asynchronous Module Definitions) which is designed to load modular code asynchronously in the browser. This way it makes you app load faster and javascript file more managable.

Now you might got an basic idea of each technology. What they do and How they do. Lets start working with those...

Create Project and Package

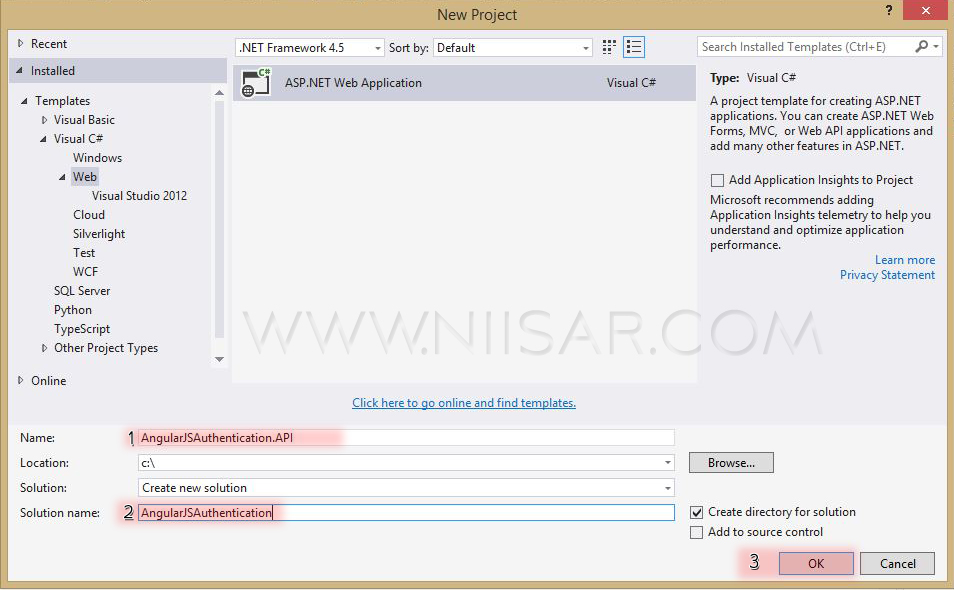
Create New ASP.NET Web Application

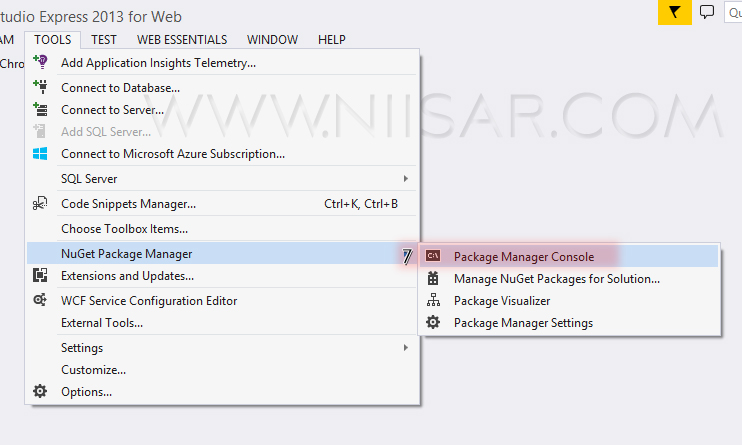
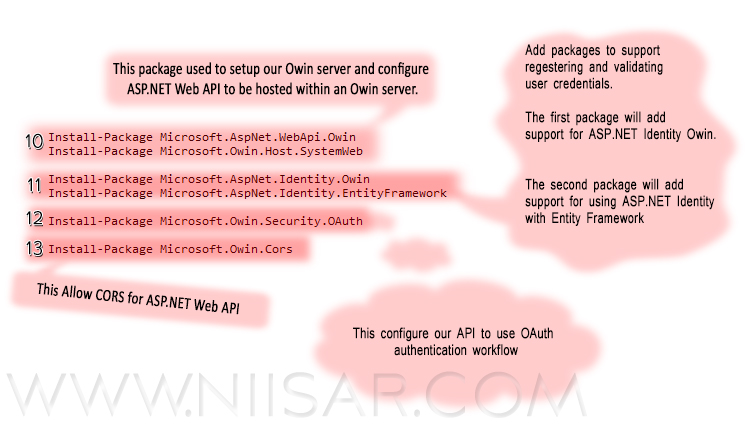
Open Package manager console and add few packages.

 Install-Package Microsoft.AspNet.WebApi.Owin
 Install-Package Microsoft.Owin.Host.SystemWeb

 Install-Package Microsoft.AspNet.Identity.Owin
 Install-Package Microsoft.AspNet.Identity.EntityFramework

 Install-Package Microsoft.Owin.Security.OAuth

 Install-Package Microsoft.Owin.Cors

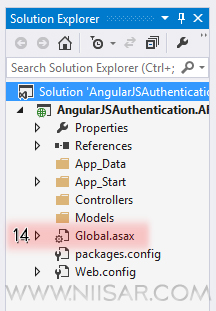
Delete Global.asax as we no need to use this class and fire up the Application_Start event and our "Startup" class so feel free to delete it.

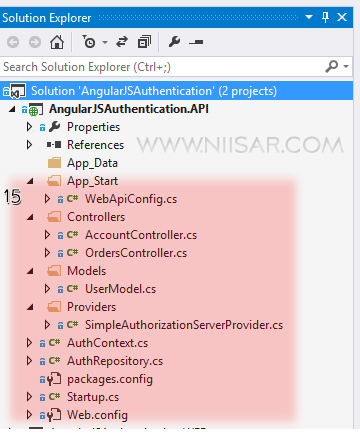
Add New Classes and Folder as show in image below.


Now Let's do few coding things. All code is well documented that you can understand it very easily

Add Connection String to Web.config

Startup.cs

AuthContext.cs

AuthRepository.cs

Providers > SimpleAuthorizationServerProvider.cs

Models > UserModel.cs

Controllers > AccountController.cs

Controllers > OrdersController.cs

App_Start > WebApiConfig.cs

Now we are done with API. Lets Start Testing it.. We will use Post Man tool to test our api.

Register

Check if user created in SQL Server Database

Get list of order without an Authorization

Generate a token

Get list of order with an Authorization

Well now we are good after testing Registering User, Generating Token, and Consuming Resource by authentication ID and Password we will write The Client Program by using AngularJS and RequireJS.

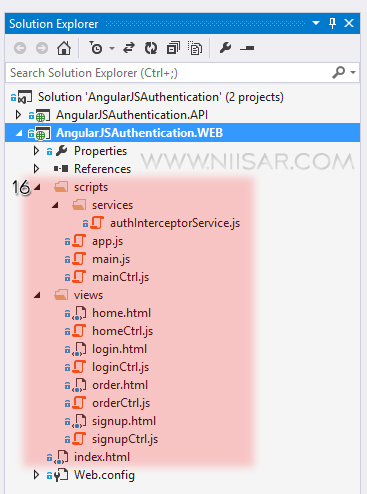
Add Project AngularJSAuthentication.WEB to the same solution and the file structure as below


And code it as below... The code is self descriptive

index.html

scripts > app.js

scripts > main.js

scripts > mainCtrl.js

scripts > services > authInterceptorService.js

Interceptor is regular service (factory) which allow us to capture every XHR request and manipulate it before sending it to the back-end API or after receiving the response from the API, in our case we are interested to capture each request before sending it so we can set the bearer token, as well we are interested in checking if the response from back-end API contains errors which means we need to check the error code returned so if its 401 then we redirect the user to the log-in page.

views > home.html

views > homeCtrl.js

views > login.html

views > loginCtrl.js

views > order.html

views > orderCtrl.js

views > signup.html

views > signupCtrl.js

Now let us test it.

Hope it helped you to understand the core concept of security in WEB API and how to use it in Angular.

You can download whole work from my GIT

Thanks for reading. ツ

Tuesday, 2 February 2016

UI Router resolves vs loading data in controller

So, What's the basic difference between running code when a controller starts and running code in a route resolver?
The basic difference is when a controller starts activation happens after the route and when we use route resolver activation happens before the route.
There may be many cases when you need to use route resolver to run few functions or ajex calls before the controller gets activated.
Those cases could be like
  • When you want to validate user crediantial.
  • Run controllers only after initialization is completed,
  • When your page elements blink due to changine routes.

Then for those cases we can use Use AngularUI Router and nested resolves to move data-loading logic out of the controller and avoid code duplication and coupling between controllers.
So how it's done... You can follow the below snippet. The code is self explanatory