Saturday, 13 February 2016

Angular 1 VS Angular 2


Angular 2 Angular 1
Performance With ultra fast change detection and immutable data structures, Angular 2 promises to be both faster and more memory efficient Angular 1 had some performance issue with a big applications.
Data binding By default Angular 2 has a uni-directional data flow, means one-way data binding. That doesn't mean you can't do two way data binding. Angular 2 support two way binding too Two-way data binding feature is default in Angular 1.
$scope Angular 2 finally kills it off, as properties are bound to components. $scope is the heart of controller in Angular 1.
UI Angular 2 adopted component-based UI like React do. Angular 1 depends on Controller and Directive for there UI.
New Base Language Angular 2 is written entirely in Typescript and meets the ECMAScript 6 specification. Angular 2 is written entirely in Javascript and meets the ECMAScript 5 specification.
Mobile Support Angular 2 was designed to be better and ready for any thing coming its way that is mobile oriented. Angular 1.x was not built with mobile support in mind, but fortunately frameworks like Ionic found favor in them.

Thanks for reading..

Final thing i want to say that...

Web Components are the future of the Web and if you are not planning to accept that yet, then you are driving on the wrong lane.

Why Does OAuth v2 Have Both Access Tokens and Refresh Tokens?

OAuth 2.0 protocol indicates that an authorization server can return both an access_token (which is used to authenticate oneself with a resource) as well as a refresh_token, which is used purely to create a new access_token:
But the question is why do we have both? Why not just make the access_token last as long as the refresh_token and not have a refresh_token! isn't it?

But going through google and stackoverflow i found nice answer that actually reason to use Refresh Token is do with claims.

Each token contains claims which can include anything from the users name, their roles or the provider which created the claim.

As a token is refreshed these claims are updated.

If we refresh the tokens more often we are obviously putting more strain on our identity services however we are getting more accurate and up-to-date claims.

Want to know more on OAuth 2.0 then click hear What is OAuth 2.

What is OAuth 2

OAuth 2 provides authorization flows for web and desktop applications, and mobile devices. It is an authorization framework that enables applications to obtain limited access or information to user accounts on an HTTP service.

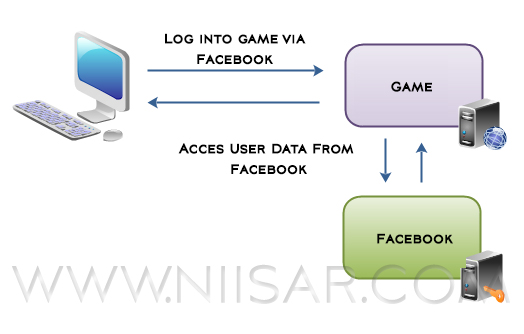
It is an open authorization protocol which enables applications to access each others data. For instance, a game application can access a users data in the Facebook application, or a location based application can access the user data of the Foursquare application etc.

We will now discuss OAuth 2's Role Types and Authorization grant types.

OAuth Roles

  • Resource Owner
  • Resource Server
  • Authorization Server
  • Client

Authorization Grant

The authorization grant type depends on the method used by the application to request authorization, and the grant types supported by the API. OAuth 2 have four grant types:

  • Authorization Code: used with server-side Applications
  • Implicit: used with Mobile Apps or Web Applications (applications that run on the user's device)
  • Resource Owner Password Credentials: used with trusted Applications, such as those owned by the service itself
  • Client Credentials:used with Applications API access

Now let's discuss the above following heads in more details.

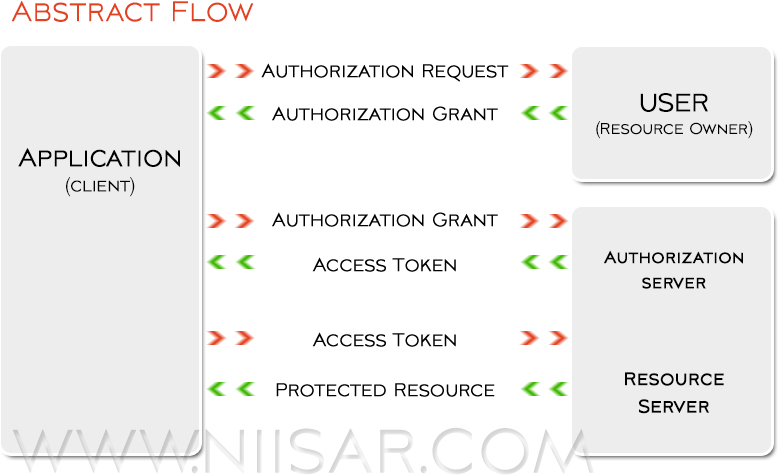
OAuth Roles > Resource Owner(user)

The resource owner is the user who authorizes an application to access their account. The application's access to the user's account is limited to the "scope" of the authorization granted (e.g. read or write access).

OAuth Roles > Resource Server(API)

The resource server hosts the protected user accounts.

OAuth Roles > Authorization Server

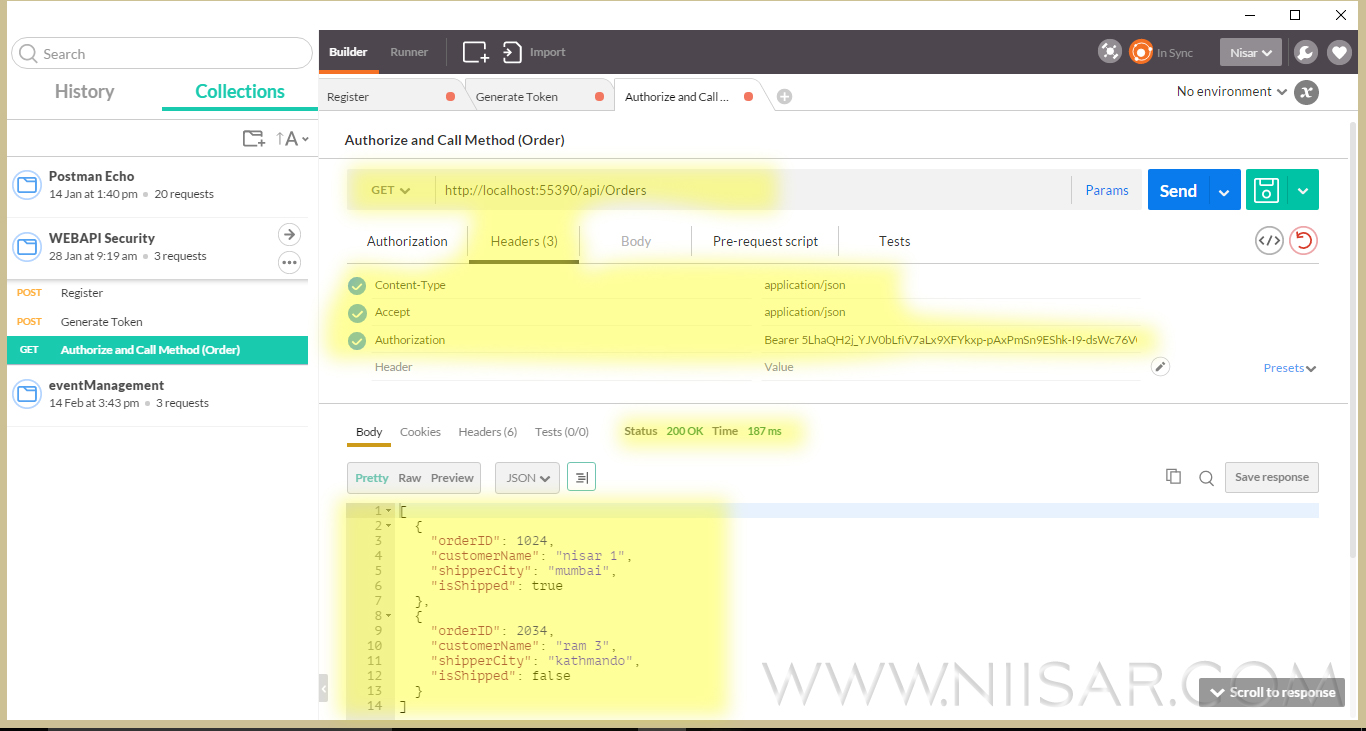
The authorization server verifies the identity of the user then issues access tokens to the application.

From developer's point of view a service's API fulfills both the resource and authorization server roles.

OAuth Roles > Client

The client is the application that wants to access the user's account. Before it may do so, it must be authorized by the user, and the authorization must be validated by the API.

Authorization Grant > Authorization Code

The authorization code grant type is the most commonly used because it is optimized for server-side applications, where source code is not publicly exposed, and Client Secret confidentiality can be maintained. This is a redirection-based flow, which means that the application must be capable of interacting with the user-agent (i.e. the user's web browser) and receiving API authorization codes that are routed through the user-agent.

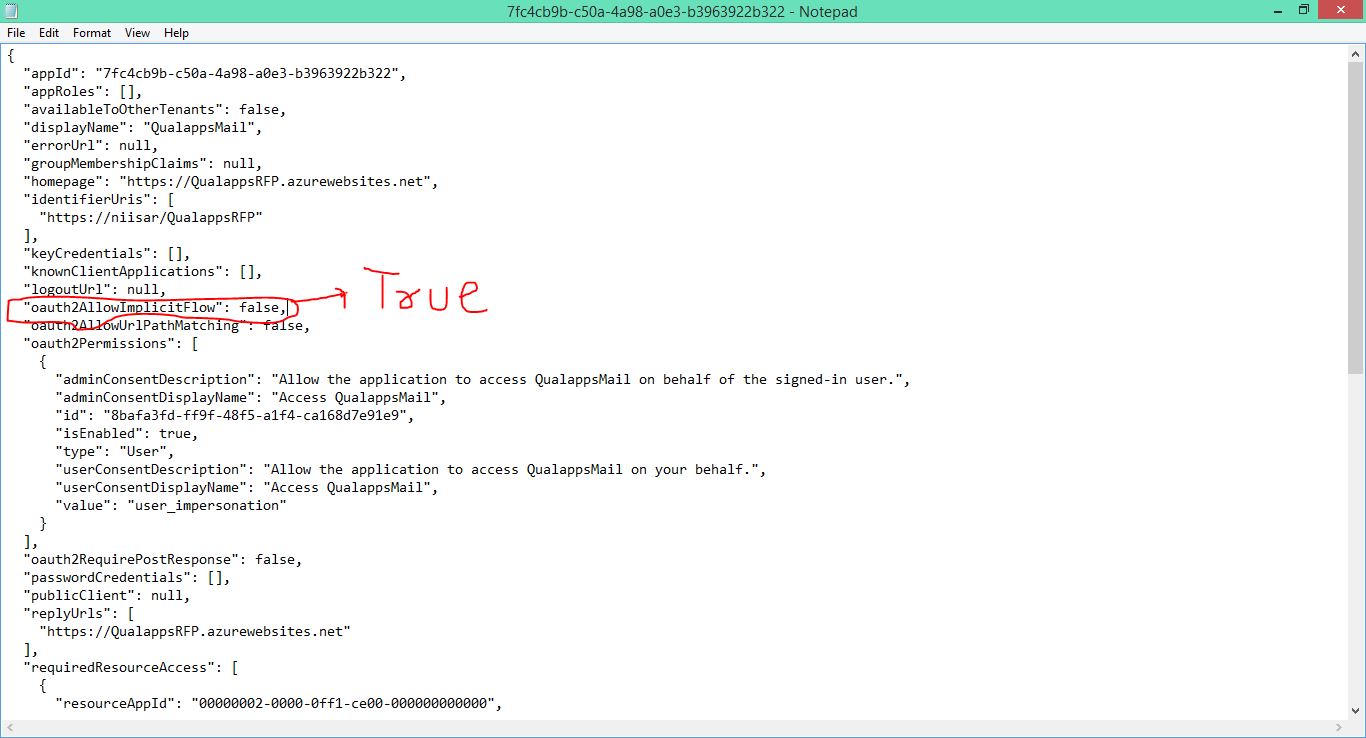
Authorization Grant > Implicit

The implicit grant type is used for mobile apps and web applications (i.e. applications that run in a web browser), where the client secret confidentiality is not guaranteed. The implicit grant type is also a redirection-based flow but the access token is given to the user-agent to forward to the application, so it may be exposed to the user and other applications on the user's device. Also, this flow does not authenticate the identity of the application, and relies on the redirect URI (that was registered with the service) to serve this purpose.

The implicit grant type does not support refresh tokens.

The implicit grant flow basically works as follows: the user is asked to authorize the application, then the authorization server passes the access token back to the user-agent, which passes it to the application. If you are curious about the details, read on.

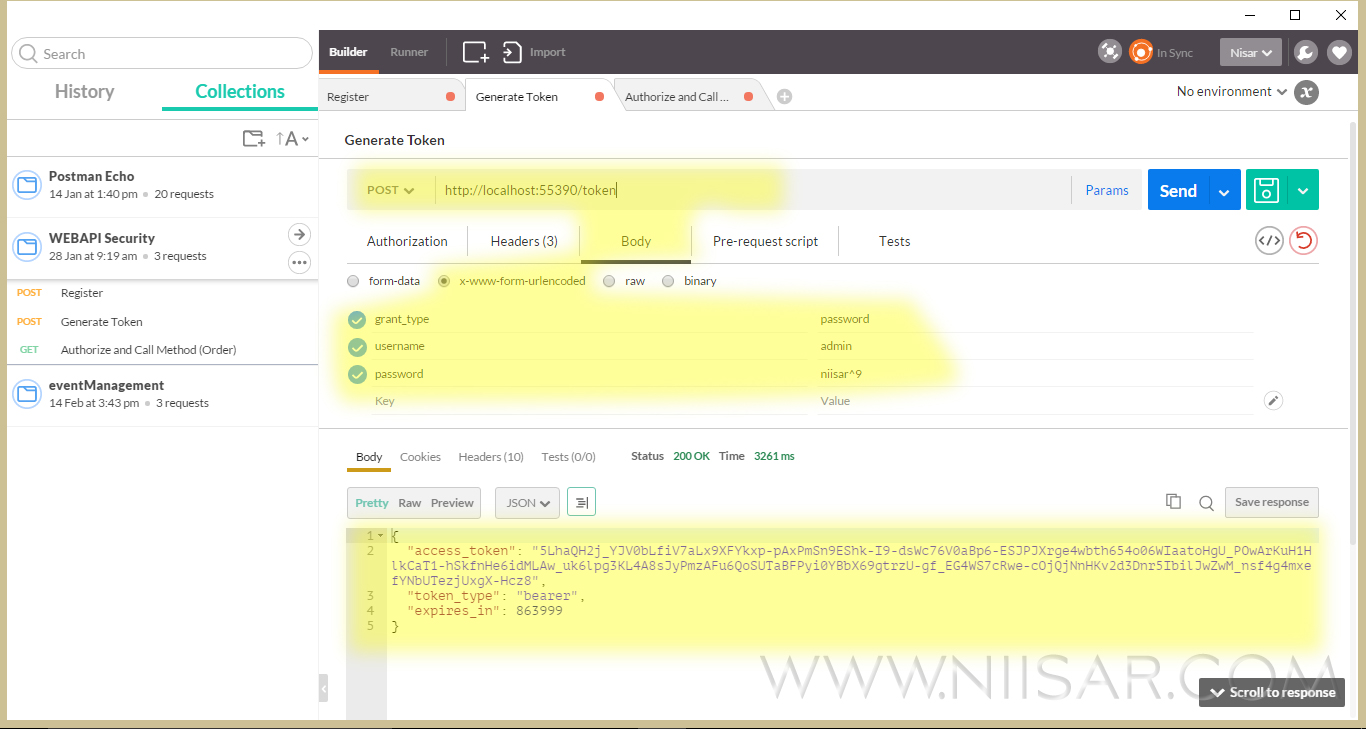
Authorization Grant > Resource Owner Password Credentials

With the resource owner password credentials grant type, the user provides their service credentials (username and password) directly to the application, which uses the credentials to obtain an access token from the service. This grant type should only be enabled on the authorization server if other flows are not viable. Also, it should only be used if the application is trusted by the user (e.g. it is owned by the service, or the user's desktop OS).

Authorization Grant > Client Credentials

The application requests an access token by sending its credentials, its client ID and client secret, to the authorization server. An example POST request might look like:

   https://oauth.example.com/token?grant_type=client_credentials&client_id=CLIENT_ID&client_secret=CLIENT_SECRET
  

Friday, 12 February 2016

Token Based Authentication using Web Api 2, OWIN, Identity, AngularJS, RequireJS

So first lets us know what those technology are and why to use those specific technology for Authentication.

ASP.NET Web API is a framework that makes it easy to build HTTP services that reach a broad range of clients, including browsers and mobile devices. ASP.NET Web API is an ideal platform for building RESTful applications on the .NET Framework.

OWIN stands for Open Web Interface for .NET. It defines a standard interface between .NET web servers and web applications. Point to Note.. It is not a framework or tecnology.. It's just a Specification.

Identity The ASP.NET Identity system is designed to replace the previous ASP.NET Membership and Simple Membership systems. It includes profile support, OAuth Integration, works with OWIN, and is included with the ASP.NET templates whipped with VS 2013.

AngularJS is most popular SPA framework. It is most widely used SPA framework developed and maintained by Google.

RequireJS is actually a fork of the Common.js specification. It is most popular AMD(Asynchronous Module Definitions) which is designed to load modular code asynchronously in the browser. This way it makes you app load faster and javascript file more managable.

Now you might got an basic idea of each technology. What they do and How they do. Lets start working with those...

Create Project and Package

Create New ASP.NET Web Application

Open Package manager console and add few packages.

 Install-Package Microsoft.AspNet.WebApi.Owin
 Install-Package Microsoft.Owin.Host.SystemWeb

 Install-Package Microsoft.AspNet.Identity.Owin
 Install-Package Microsoft.AspNet.Identity.EntityFramework

 Install-Package Microsoft.Owin.Security.OAuth

 Install-Package Microsoft.Owin.Cors

Delete Global.asax as we no need to use this class and fire up the Application_Start event and our "Startup" class so feel free to delete it.

Add New Classes and Folder as show in image below.


Now Let's do few coding things. All code is well documented that you can understand it very easily

Add Connection String to Web.config

Startup.cs

AuthContext.cs

AuthRepository.cs

Providers > SimpleAuthorizationServerProvider.cs

Models > UserModel.cs

Controllers > AccountController.cs

Controllers > OrdersController.cs

App_Start > WebApiConfig.cs

Now we are done with API. Lets Start Testing it.. We will use Post Man tool to test our api.

Register

Check if user created in SQL Server Database

Get list of order without an Authorization

Generate a token

Get list of order with an Authorization

Well now we are good after testing Registering User, Generating Token, and Consuming Resource by authentication ID and Password we will write The Client Program by using AngularJS and RequireJS.

Add Project AngularJSAuthentication.WEB to the same solution and the file structure as below


And code it as below... The code is self descriptive

index.html

scripts > app.js

scripts > main.js

scripts > mainCtrl.js

scripts > services > authInterceptorService.js

Interceptor is regular service (factory) which allow us to capture every XHR request and manipulate it before sending it to the back-end API or after receiving the response from the API, in our case we are interested to capture each request before sending it so we can set the bearer token, as well we are interested in checking if the response from back-end API contains errors which means we need to check the error code returned so if its 401 then we redirect the user to the log-in page.

views > home.html

views > homeCtrl.js

views > login.html

views > loginCtrl.js

views > order.html

views > orderCtrl.js

views > signup.html

views > signupCtrl.js

Now let us test it.

Hope it helped you to understand the core concept of security in WEB API and how to use it in Angular.

You can download whole work from my GIT

Thanks for reading. ツ

Tuesday, 2 February 2016

UI Router resolves vs loading data in controller

So, What's the basic difference between running code when a controller starts and running code in a route resolver?
The basic difference is when a controller starts activation happens after the route and when we use route resolver activation happens before the route.
There may be many cases when you need to use route resolver to run few functions or ajex calls before the controller gets activated.
Those cases could be like
  • When you want to validate user crediantial.
  • Run controllers only after initialization is completed,
  • When your page elements blink due to changine routes.

Then for those cases we can use Use AngularUI Router and nested resolves to move data-loading logic out of the controller and avoid code duplication and coupling between controllers.
So how it's done... You can follow the below snippet. The code is self explanatory

Tuesday, 15 December 2015

How to Creating Azure Active Directory to provides identity services

To authenticate your applications, you need to register them in Microsoft Azure Active Directory (Azure AD). This is where Office 365 user account and application information is stored. To manage Azure AD through the Azure Management Portal, you need a Microsoft Azure subscription.

  1. Sign into the Azure Management Portal using your Office 365 business account credentials.
  2. Click the Active Directory node in the left column and select the directory linked to your Office 365 subscription.

    If Active Directory is not available on left go thought this step
    • Click New -> Search (Active Directory) -> Click on Active Directory
    • Click on Create Button it will navigate to Active Directory Page
    • Now if there is Popup Add directory. We can Close it
  3. Click First Small arrow in row.
  4. Click First Small arrow in row.
  5. Select the Applications tab and then Add at the bottom of the screen.
  6. On the pop-up, select Add an application my organization is developing. Then click the arrow to continue.
  7. Choose a name for the app, such as QualappsMail, and select Web application as its Type. Then click the arrow to continue.
  8. The value of Sign-on URL is the URL where the application will be hosted. Use https://QualappsRFP.azurewebsites.net.

    The value of App ID URI is a unique identifier for Azure AD to identify the app. You can use http://{your_subdomain}/SimpleMailApp, where {your_subdomain} is the subdomain of .onmicrosoft you specified while signing up for your Office 365 business account. Then click the check mark to provision the application.
  9. Once the application has been successfully added, you will be taken to the Quick Start page for the application. From here, select the Configure tab.
  10. Scroll down to the permissions to other applications section and click the Add application button.
  11. In this add the Office 365 Exchange Online application. Click the plus sign in the application's row and then click the check mark at the top right to add it. Then click the check mark at the bottom right to continue.
  12. In the Office 365 Exchange Online row, select Delegated Permissions, and in the selection list, choose Read user profiles, Send mail as a user, Read user mail.
  13. Click Save to save the app's configuration.
Configure the app to allow the OAuth 2.0 implicit grant flow

In order to get an access token for Office 365 API requests, the application will use the OAuth implicit grant flow. We need to update the application's manifest to allow the OAuth implicit grant flow because it is not allowed by default.

  1. Select the Configure tab of the application's entry in the Azure Management Portal.
  2. Using the Manage Manifest button in the drawer, download the manifest file for the application and save it to the computer.
  3. Open the manifest file with a text editor. Search for the oauth2AllowImplicitFlow property. By default it is set to false; change it to true and save the file.
  4. Using the Manage Manifest button, upload the updated manifest file.
  5. Browse and add Manifest file.
  6. Finally thing is. Now we are good with ClientId which is required to integrate it in our App.