Tuesday, 15 December 2015

How to Creating Azure Active Directory to provides identity services

To authenticate your applications, you need to register them in Microsoft Azure Active Directory (Azure AD). This is where Office 365 user account and application information is stored. To manage Azure AD through the Azure Management Portal, you need a Microsoft Azure subscription.

  1. Sign into the Azure Management Portal using your Office 365 business account credentials.
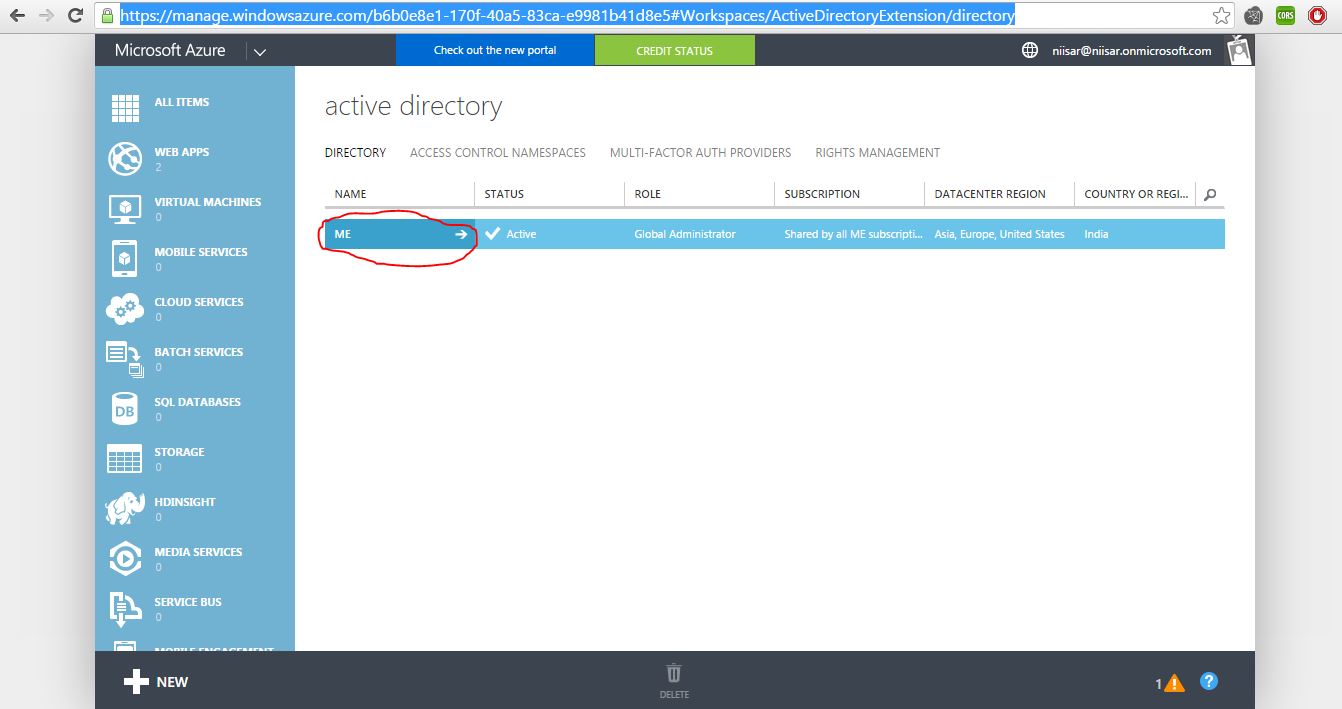
  2. Click the Active Directory node in the left column and select the directory linked to your Office 365 subscription.

    If Active Directory is not available on left go thought this step
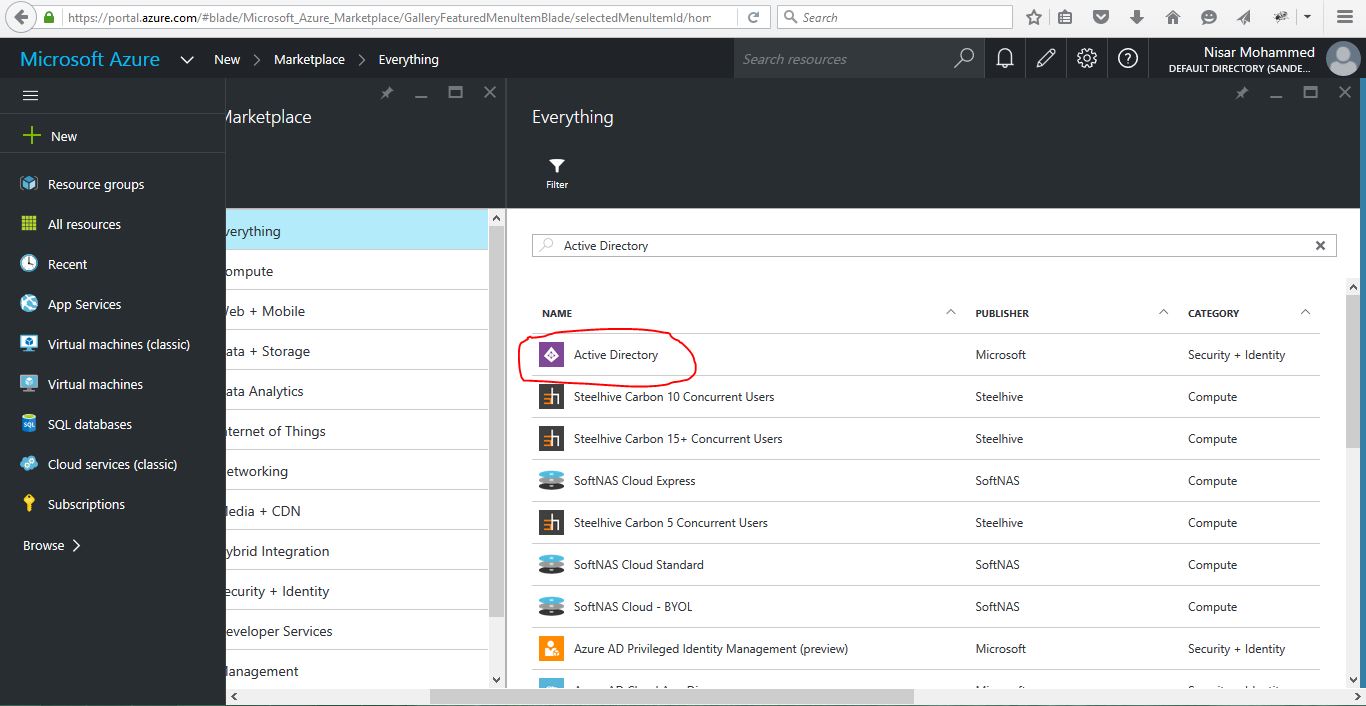
    • Click New -> Search (Active Directory) -> Click on Active Directory
    • Click on Create Button it will navigate to Active Directory Page
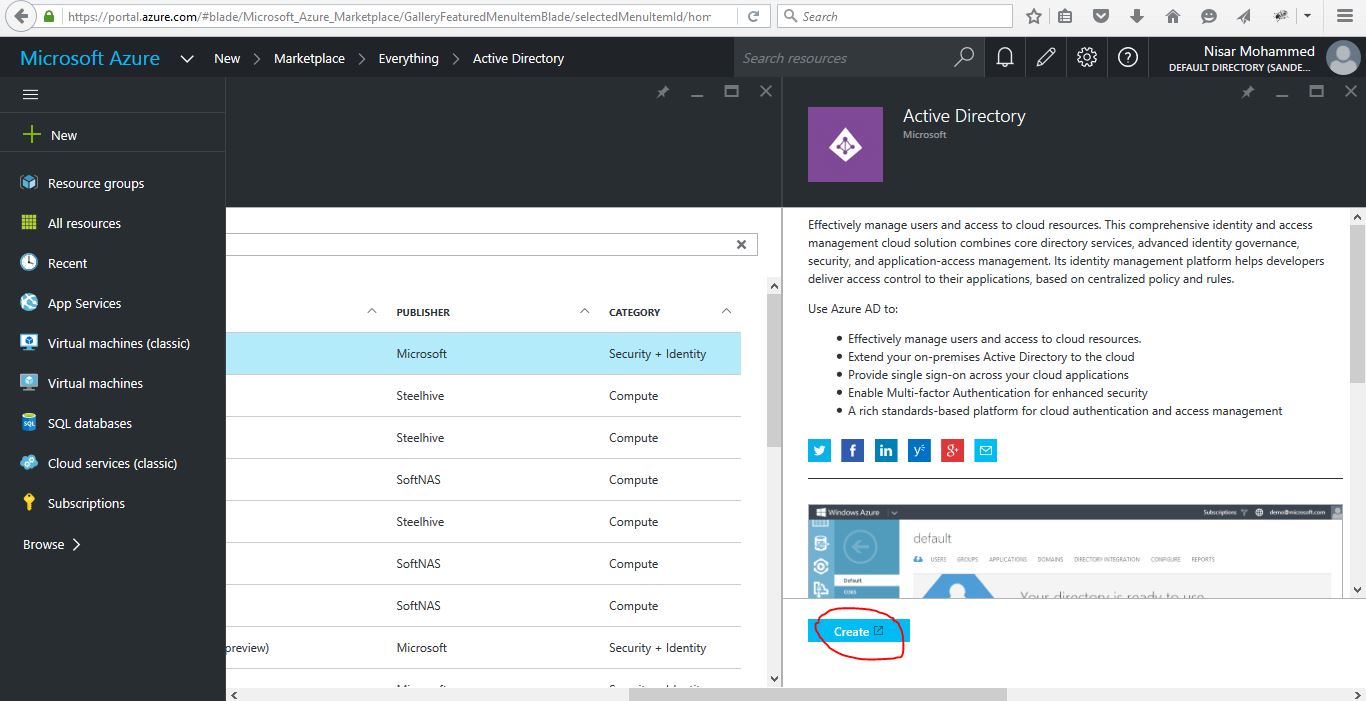
    • Now if there is Popup Add directory. We can Close it
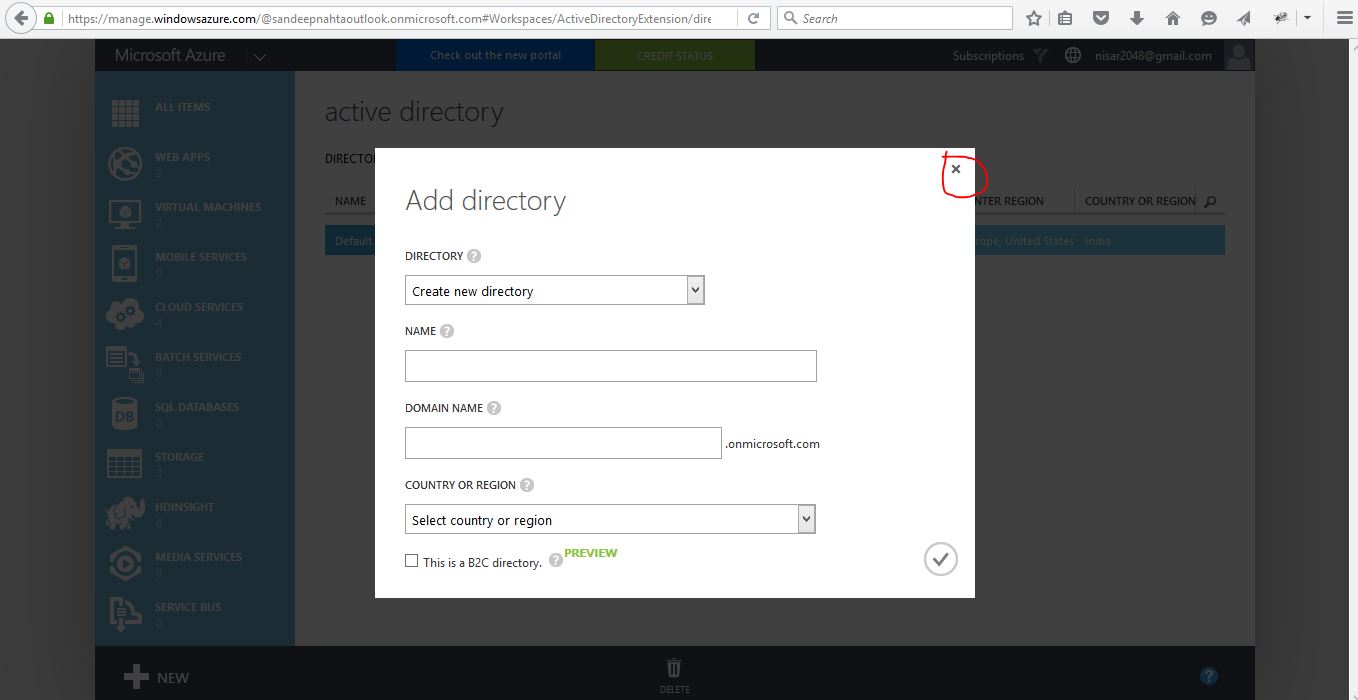
  3. Click First Small arrow in row.
  4. Click First Small arrow in row.
  5. Select the Applications tab and then Add at the bottom of the screen.
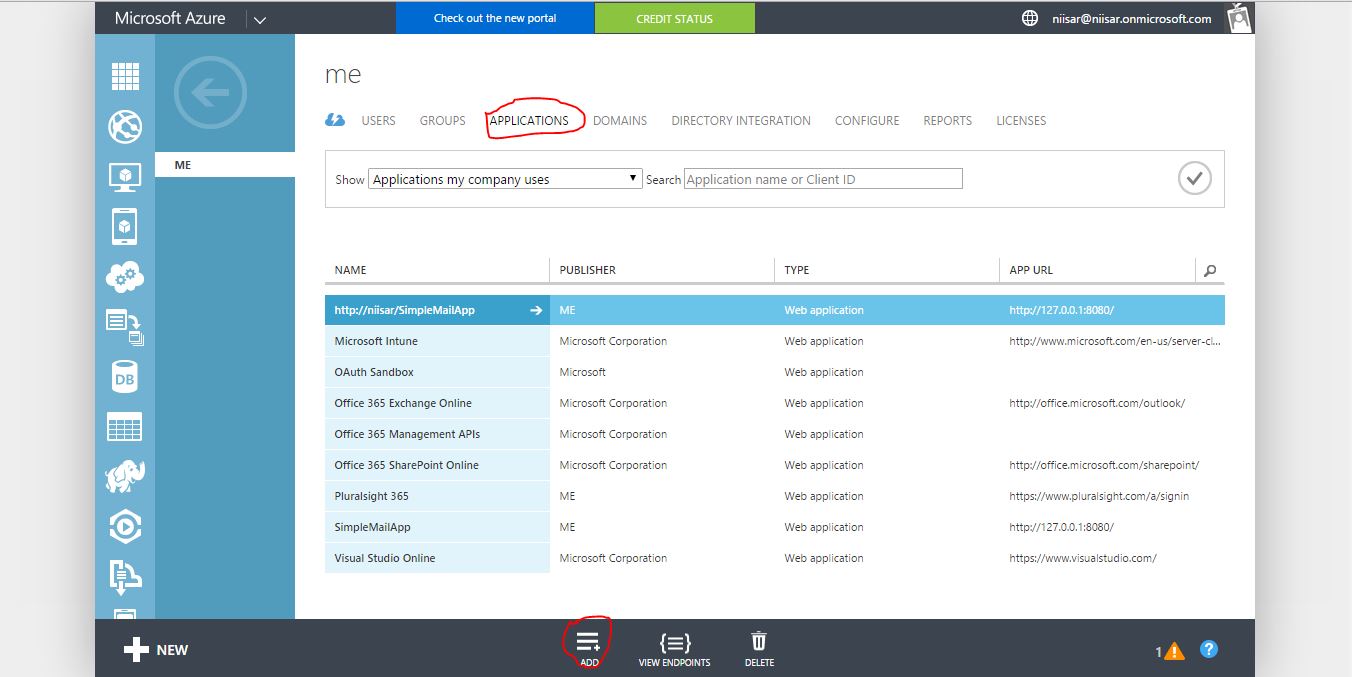
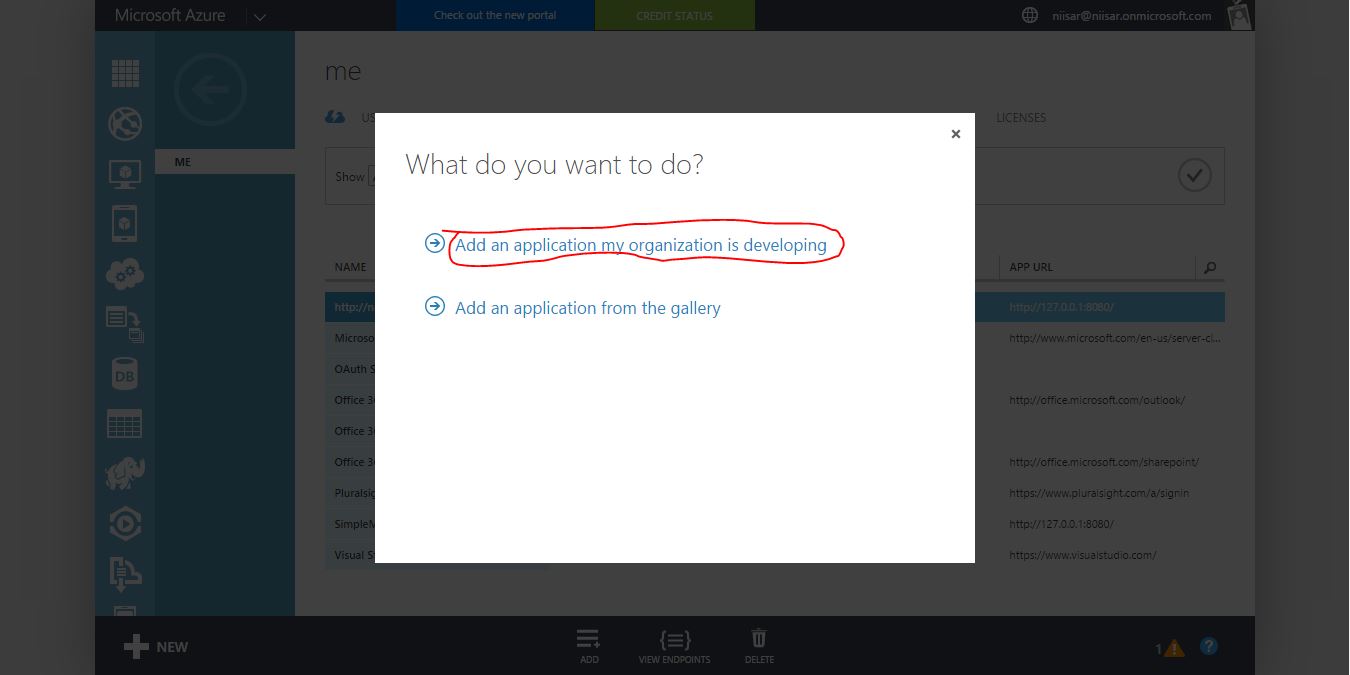
  6. On the pop-up, select Add an application my organization is developing. Then click the arrow to continue.
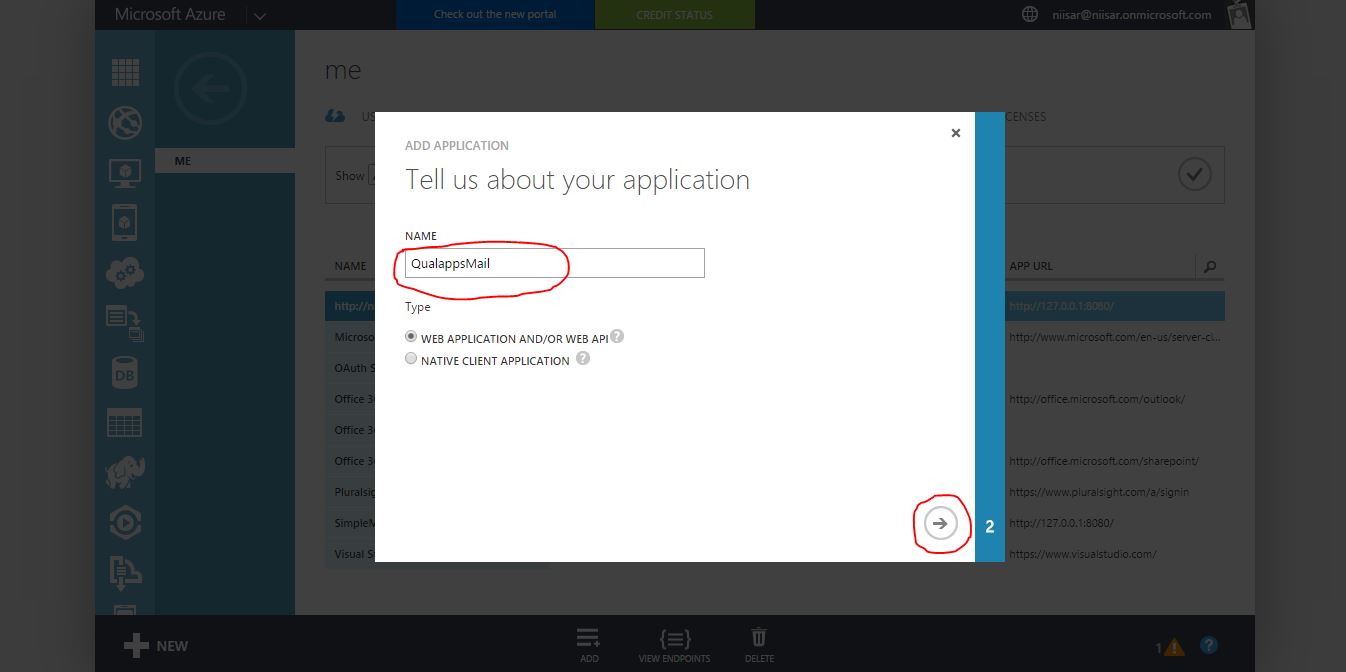
  7. Choose a name for the app, such as QualappsMail, and select Web application as its Type. Then click the arrow to continue.
  8. The value of Sign-on URL is the URL where the application will be hosted. Use https://QualappsRFP.azurewebsites.net.

    The value of App ID URI is a unique identifier for Azure AD to identify the app. You can use http://{your_subdomain}/SimpleMailApp, where {your_subdomain} is the subdomain of .onmicrosoft you specified while signing up for your Office 365 business account. Then click the check mark to provision the application.
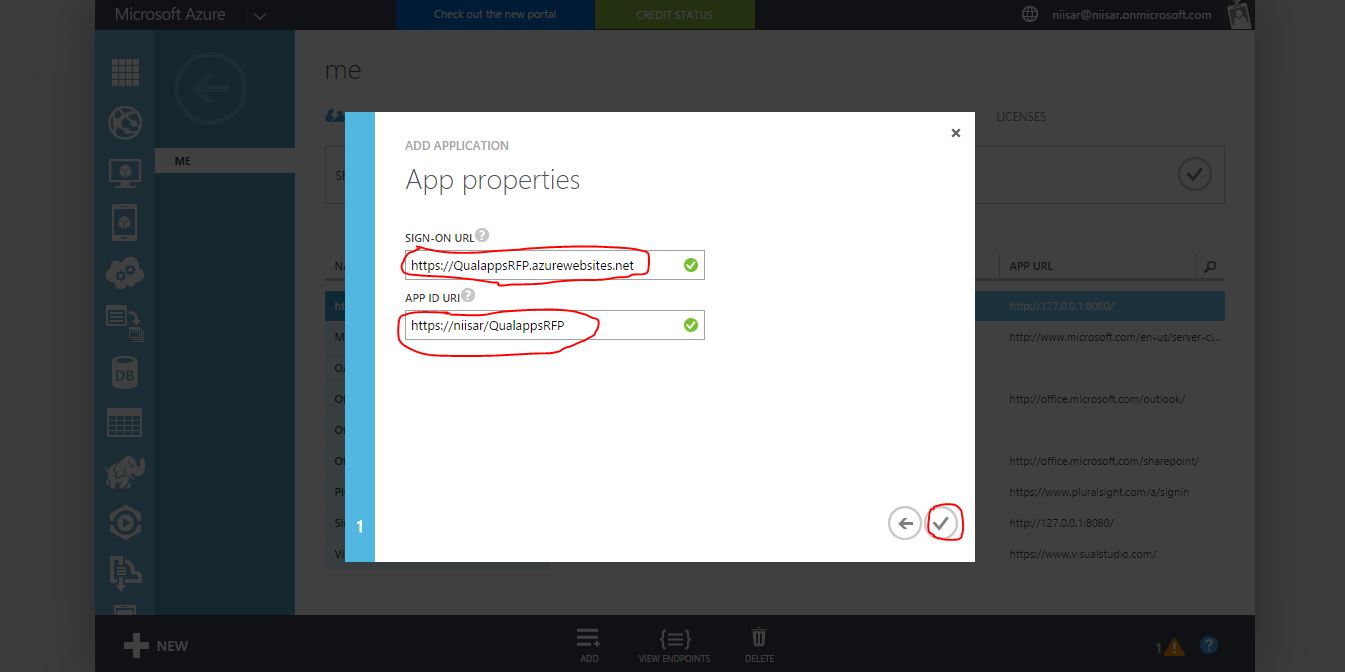
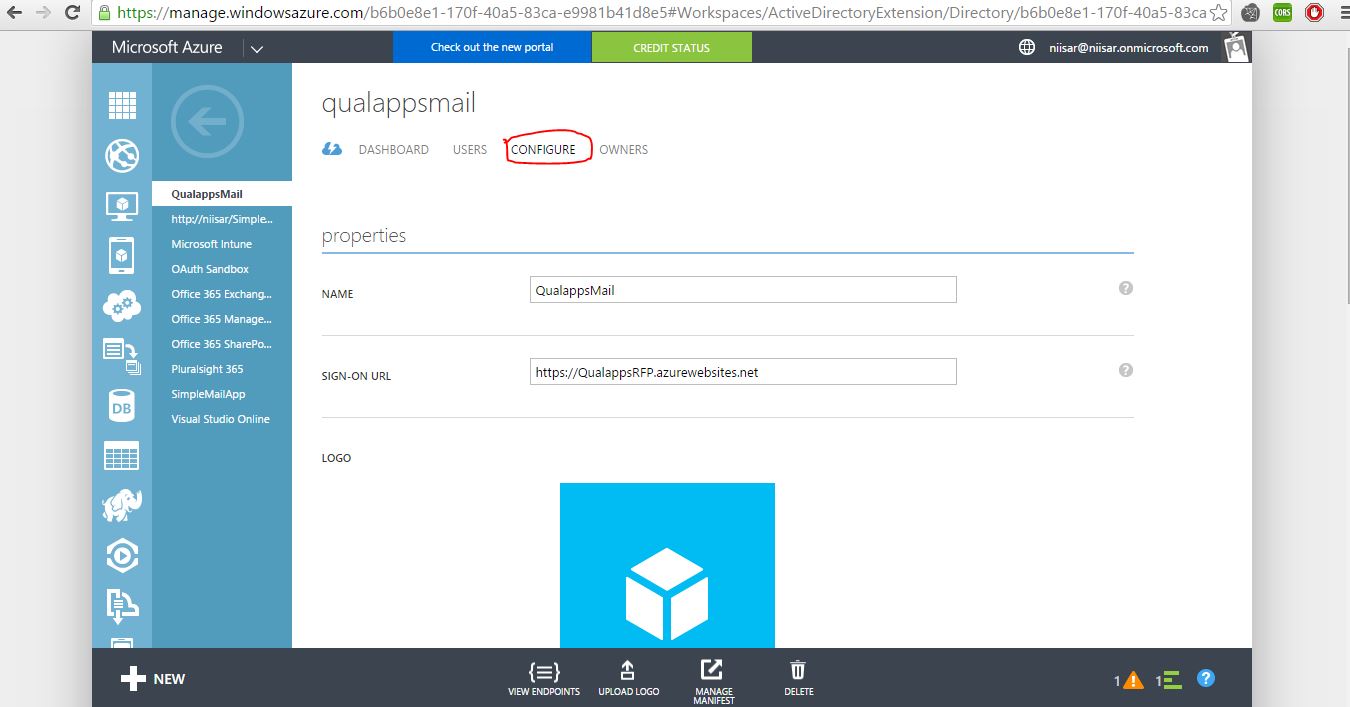
  9. Once the application has been successfully added, you will be taken to the Quick Start page for the application. From here, select the Configure tab.
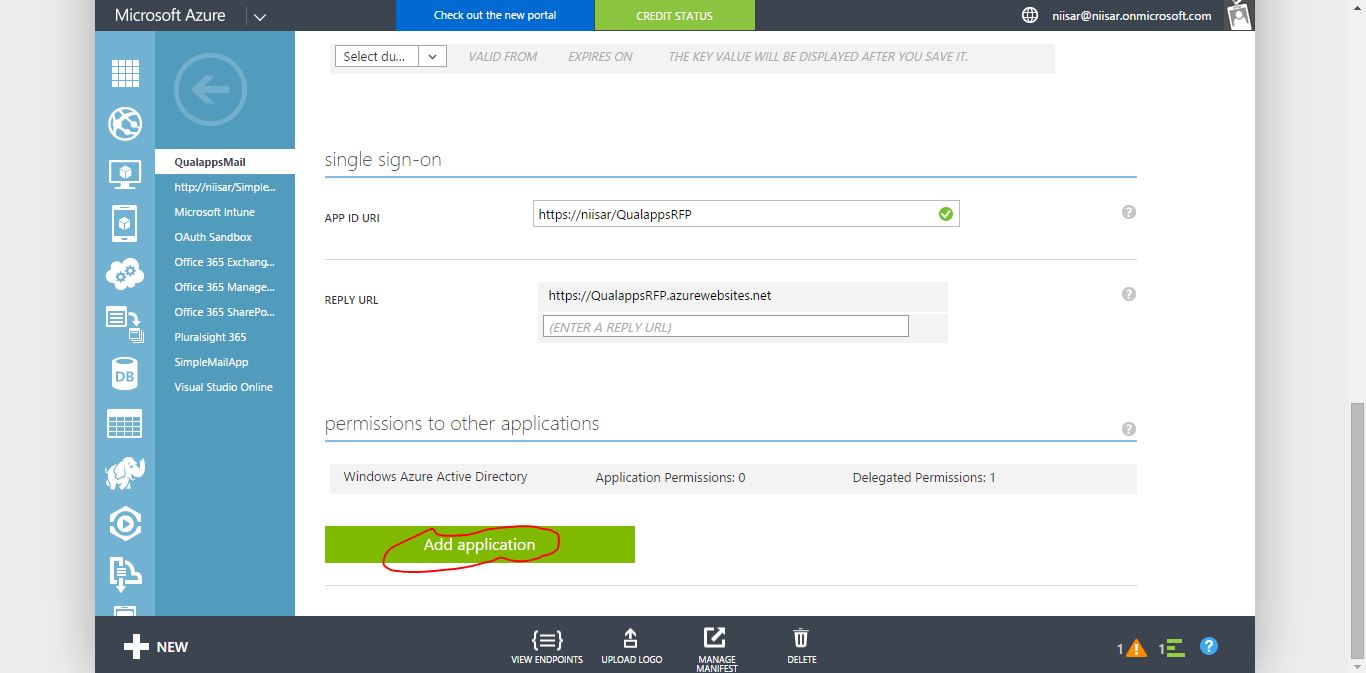
  10. Scroll down to the permissions to other applications section and click the Add application button.
  11. In this add the Office 365 Exchange Online application. Click the plus sign in the application's row and then click the check mark at the top right to add it. Then click the check mark at the bottom right to continue.
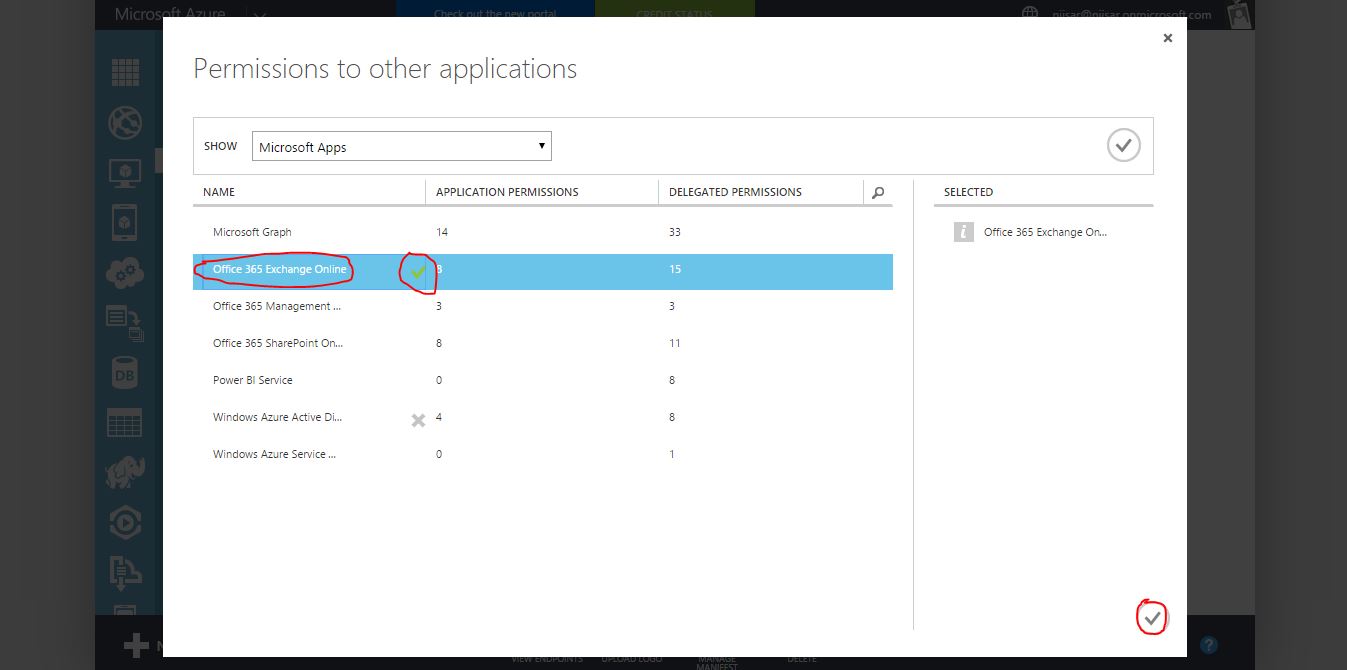
  12. In the Office 365 Exchange Online row, select Delegated Permissions, and in the selection list, choose Read user profiles, Send mail as a user, Read user mail.
  13. Click Save to save the app's configuration.
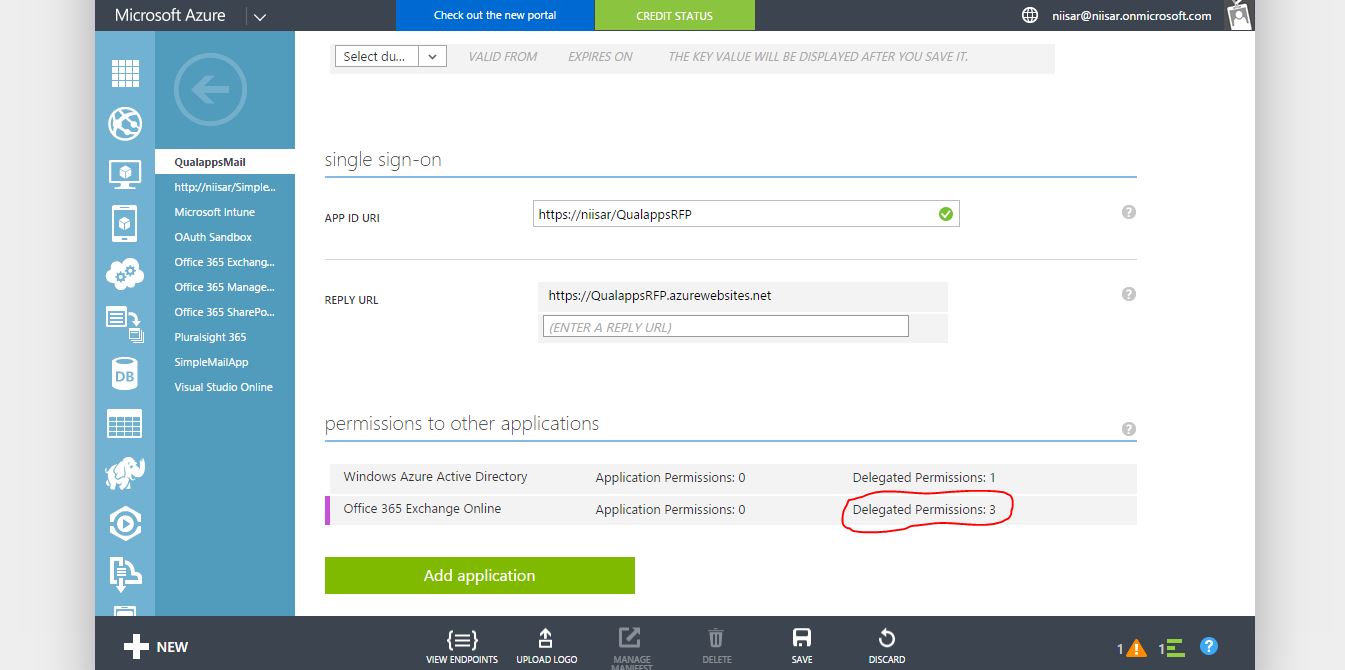
Configure the app to allow the OAuth 2.0 implicit grant flow

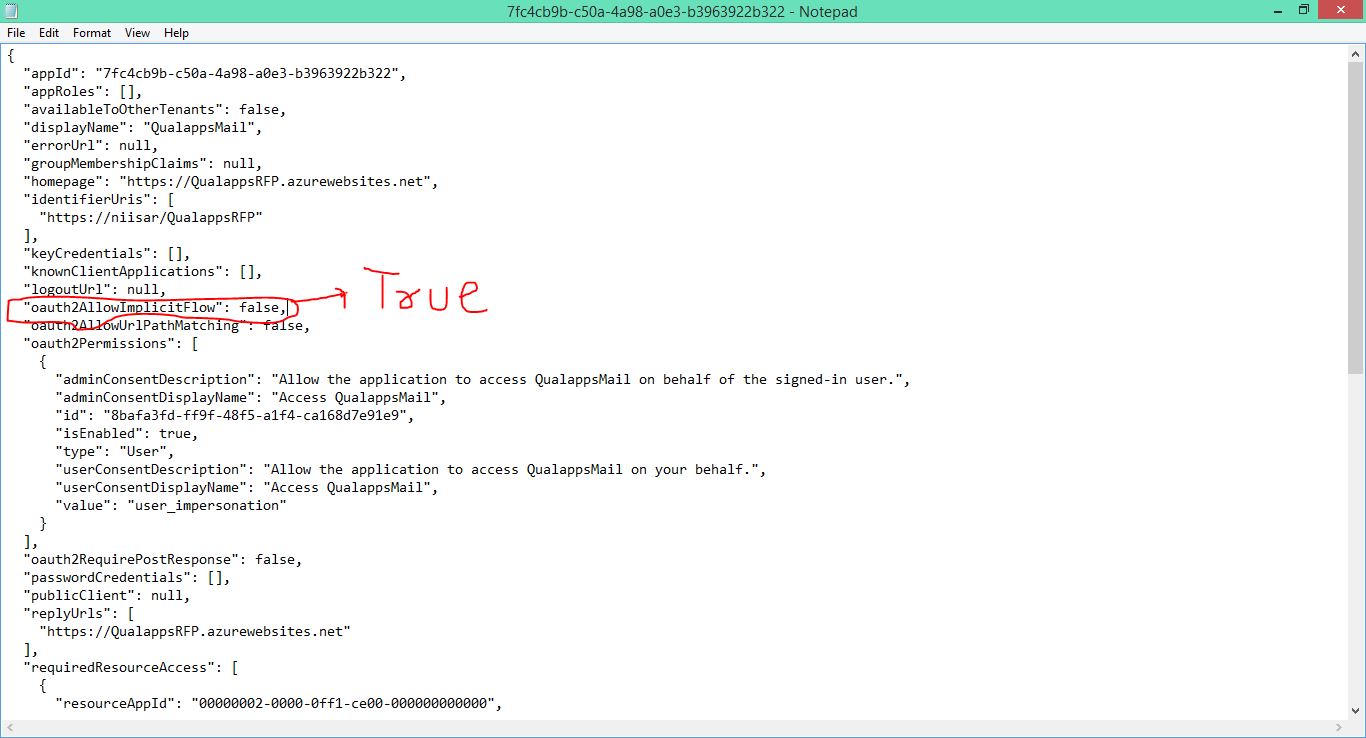
In order to get an access token for Office 365 API requests, the application will use the OAuth implicit grant flow. We need to update the application's manifest to allow the OAuth implicit grant flow because it is not allowed by default.

  1. Select the Configure tab of the application's entry in the Azure Management Portal.
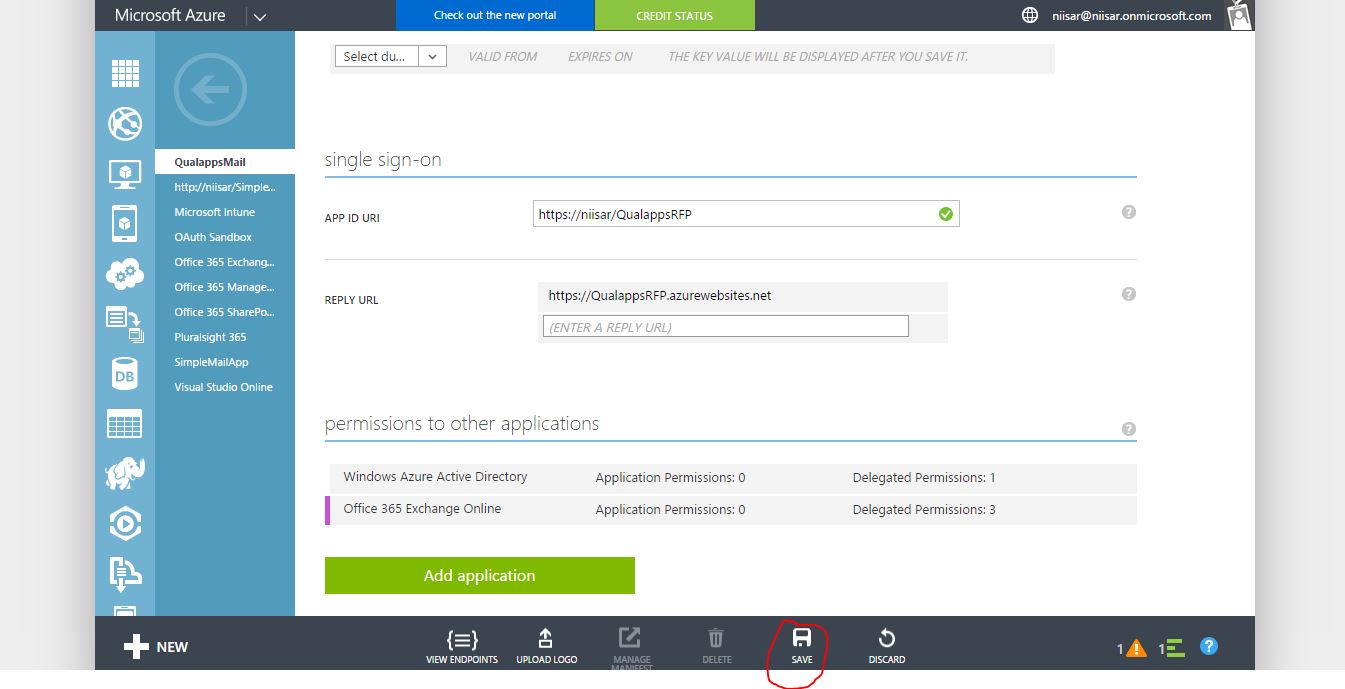
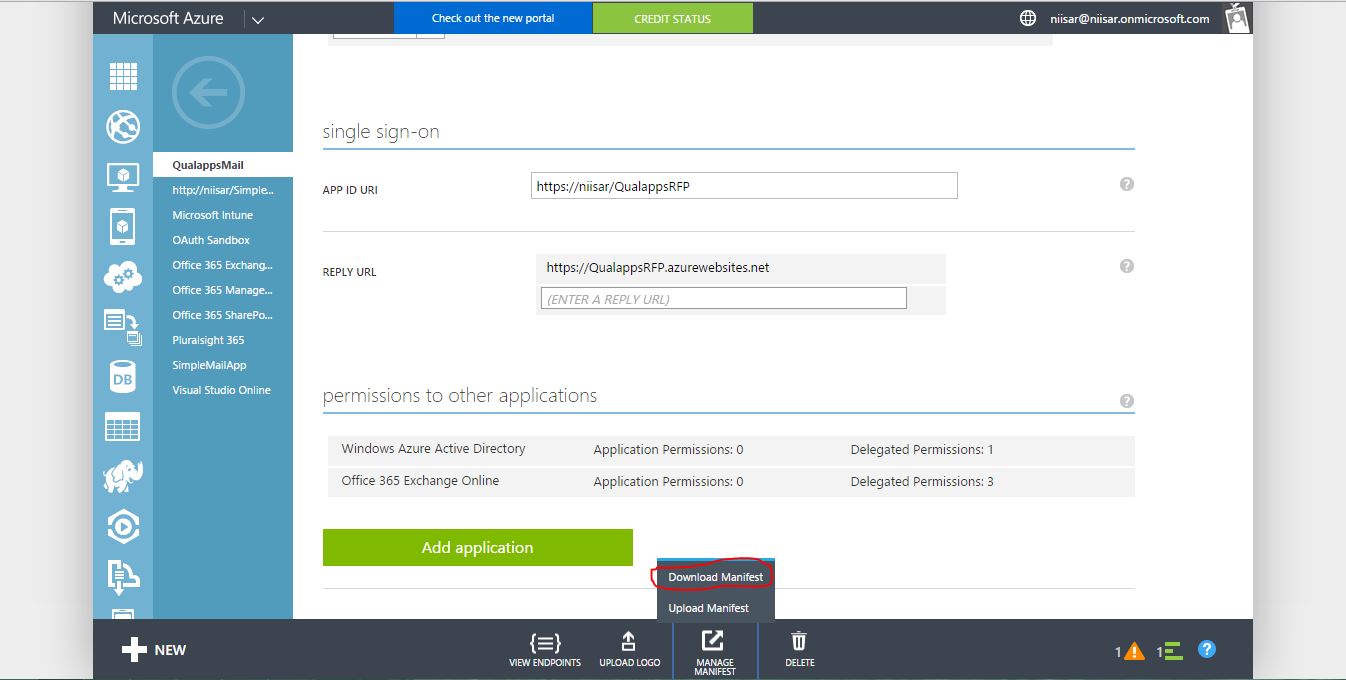
  2. Using the Manage Manifest button in the drawer, download the manifest file for the application and save it to the computer.
  3. Open the manifest file with a text editor. Search for the oauth2AllowImplicitFlow property. By default it is set to false; change it to true and save the file.
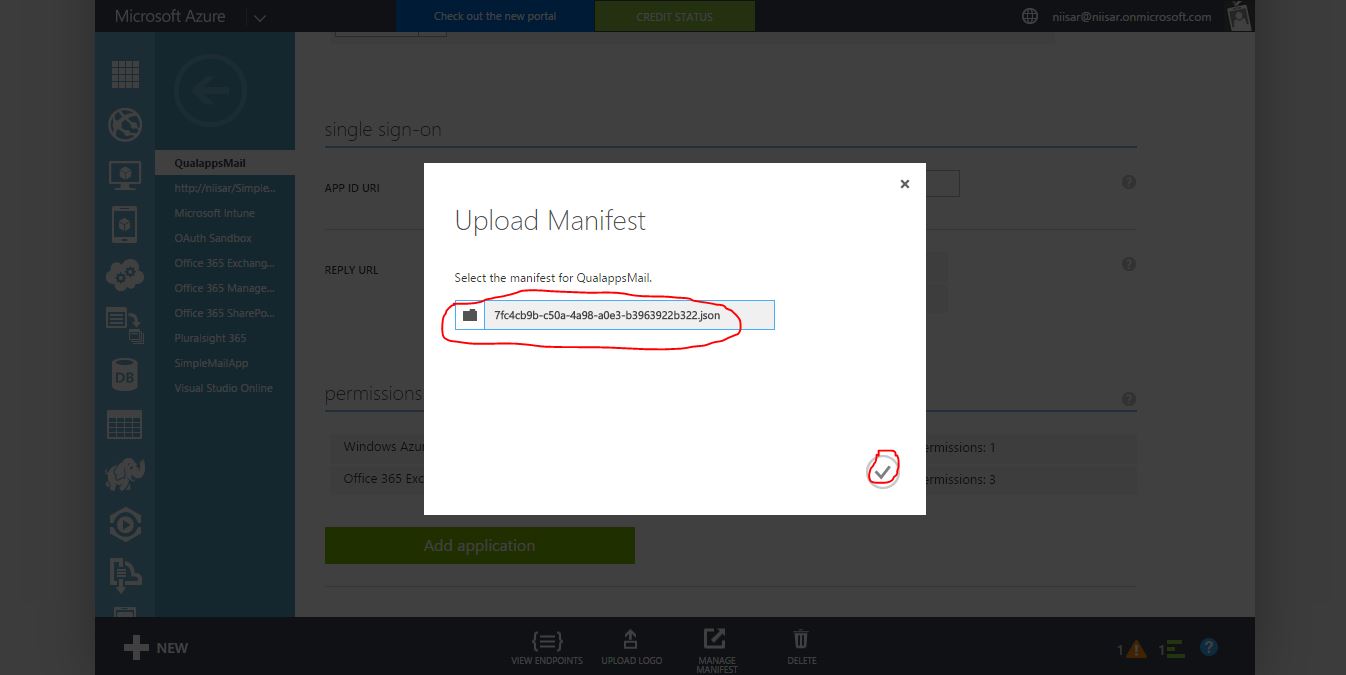
  4. Using the Manage Manifest button, upload the updated manifest file.
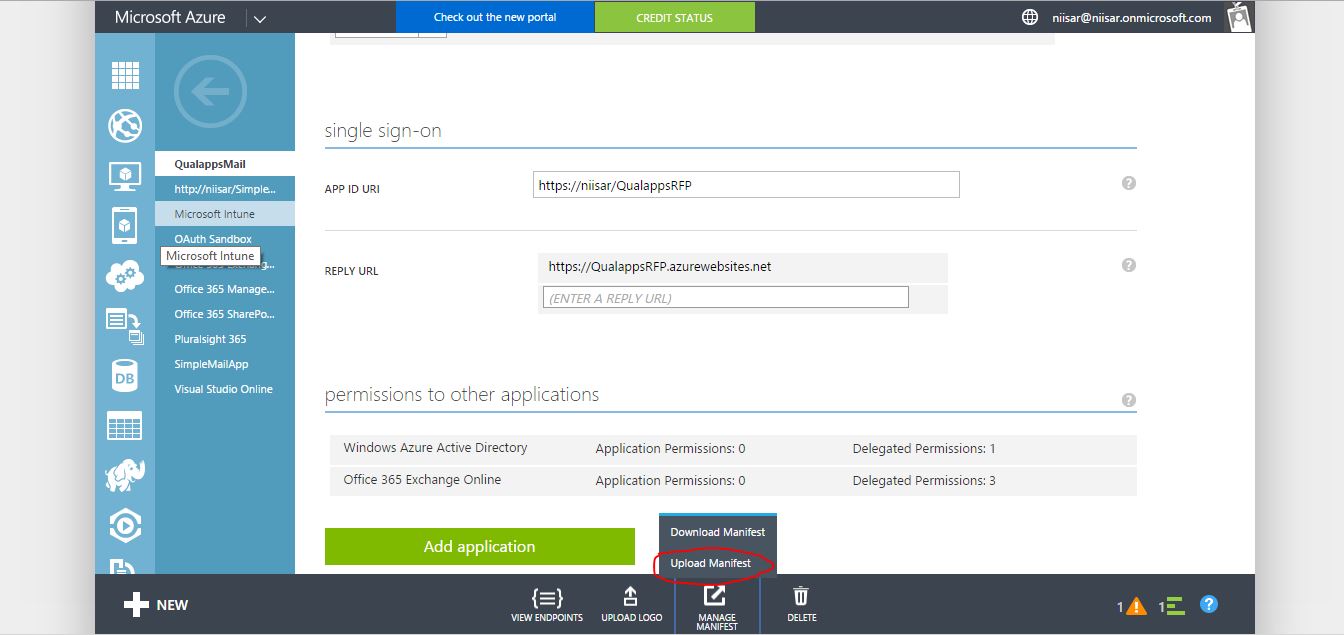
  5. Browse and add Manifest file.
  6. Finally thing is. Now we are good with ClientId which is required to integrate it in our App.

Sunday, 29 November 2015

Difference between ng-model and ng-bind

ng-bind has one-way data binding ($scope --> view). It has a shortcut {{ val }} which displays the scope value $scope.val inserted into html where val is a variable name.

ng-model is intended to be put inside of form elements and has two-way data binding ($scope --> view and view --> $scope) e.g. <input ng-model="val"/>.

7VhPb+I+EP00HCuRP6TtEbrt/i4/aaVK3bNJTGLhZLKOKdBP33E8SXAClG6p2q7KAezx2J6Z9/yCMwpu8s1Pxcrsf0i4HPnjZDMKfox8/+pqjN/GsLWGyRh7xpAqkViT1xnuxRMnI81LVyLhleOoAaQWpWuMoSh4rB0bUwrWrtsCpLtrydJmx85wHzM5tP4Wic4oLT/q7P9xkWbNzl50bUfmLF6mClYF7Tfyg0X9scM5a9aiRDdj2/U9KtCWDAEtWLLCCekJIHcMildd+Shd4VakYI9OX4pi6RZoDirhaiey4BbRVQC4kGnlmxsuDcINejb8uwOjbfkULyiU4xOimF+GXsiicTyPkmv/ggr9yOSKcrOGSm8bjHiCkFEXlM4ghYLJ2846q3HgZgss6izTucSmh81KK1i2yBoLL5Kp4Q125xLipTXdCYyydSCaeqZrozEhHMyYTBWsVExegzRD4jZTKadpA59JiweeNg4512pb4y6ZFo/u/oxgTVu/rujYoLqfiAEF52AQSQxztgBMcheM6M/KUKUeuLB8nKKDd1VuukFspfY3rGIoebMaBmYXbIZ7QHcwmsqvM6H5fcnqmq5RfXrQZiypYTSdVLLKVMTAP8Sc0uNKc9KtQygOq08TUBPo2Db6Red63amG15z1bEcxIrKdFbCaKe8A2IPg638QrBaEDwGLYvlqCndUzuiZdVTOmkf8CbidLHH1VMyOmVmNQwmi0NXOyr+MoaPDZNyjQ/8Z9Tp/bNgIOjq0qfwdQ6ia3/p7+EiHl59JfxtqfwvwaWh9rACjyn1uBV5IUT441X/5/+ZbRXSoepPeCetjYR8INOuYfPYWGoBqnxqDhV4t6/19XpL14/7nl/XmprfDuyK9mAu8Mvbph0fNnPEBq25AgrmtFVAYDi6QQj0TkyI1F8cY6WEudjNzcAVecKc0MAetzU1yr0IAei9kzdRMJAnHCTtEPyocRpuIxFhI6lNGl+f4E+cFDlzhHgmZ7JGQ4F0khGJ5g+Bj7nsEHwmR23cqp4n+VyXKGYkR9s7xOxIDu92rESsJ3Vuw4PYZ

DEMO

Talking between Controllers using $emit, $broadcast and $on in AngularJS

AngularJS provides $on, $emit, and $broadcast services for event-based communication between controllers.

7ZlRc6o6EMc/jY/tABG0j7XtaV/uzJ1x5pxzHyNEZIrEG7BqP303yQYIUFu97UV76oPDbmCT/PcHZMmA3Cy394KuFn/xiKUDz4m2A3I78Lzx2IF/6dhph++AJR2xSCLtcivHNHlm6MTr4nUSsdw6seA8LZKV7Qx5lrGwsHxUCL6xT5vz1O51RWPTY+WYhjRte38lUbHAaXlB5X9gSbwwPbvBlW6Z0fAxFnydYX8Dj8zVTzcvqYmFE906GMHX9s7YY9NTZo3omfOl5RAsr9TD2Sa2IBl9suw0yR5tfWZcREzUBkbuILmCcwgkj5bbG5bKBJvk6dH/eKW1VE+wDIey/wLPGxI/cD3HJZE/I+QCIzzRdI1zG3hDOZ5pyFdMN+bFzqQLogEZYEw2i6Rg0xUNZcsG2ATfolimYLlwqDLDZK/Syhc04hs04pTmUhVIwCQvBH8sMw9yTFZMJEtWMCFjJ1mMJ+IwmSgYot8xd+XCid8zDmHETqZetxKfYOrNraLNTcUdCKN9ixpz5hajmMq4jFwJDQeo9Tt1x7vU1j3/XzT/ACndK9QEpXRHfWqJabW1HHhBCp1Ocnlje0GsjrW+ugG6qbedg+y+kfQkZMcHqSV7W/MK67OV3XVs2YmRuBfZ8c349Wn3glOSffSnPmT6lR1XZ19f9uZDZtir7KY8sHRviphF17ICACuUWiShrR1MXOx+o0LK+MeSi0Wt0qAhFnTH10KlZs/ataAiZnhZ99qgLXpNVLMMrGtqfIKltEie7GF2CY09/M0TmEC14jS5wZyWVZcJoaeHV9WX7W8FIs7lyHWC0dh1x4E/HOFLwcTVkrTiKgxKFY4ko6tiOJaM0uiBDDXsbzI+kIyudfjRz4xL/5PYwFHuZUO97Ptiw2+klJg3w6FstAJ5/bEB7+wzYAMHtZcNVfb0xUYZ57+y0QrUIxtdheR5sqFE+2bjA9noqnZPjw0keC8bqpLpiw23UUsPTdxD2WgFGvXHRldtqOu/OVdjriAJ/l3LT+yq4UJ/x7+GE7zhals11j5ZzQSnUUhziFJWlDroaxXlGxDaH7qlZ56k6Q1Pud4NMJsX5sxai6N+uvyEEpfcqn2XA+DtCzrDgkGlWam+l7lGnCa6n4kYbjZ9BmJsCbtHJ0zXHD6RPOBjUh7/xMgnT50ppQx2AT6dD8auEYg04hzNHZjVjp8+vdrbJXcv

The key thing to remember when using $scope to fire your events, is that they will communicate only with immediate parent or child scopes only! Scopes aren’t always child and parent. We might have sibling scopes. Using $scope to fire an event will miss out sibling scopes, and just carry on up! They do not go sideways!

So to solve this problem we can use $broadcast and $emit.

$broadcast

We could fire an event down from ParentCtrl to SiblingOneCtrl using $broadcast:

$emit

If we wanted to communicate upwards, from SiblingOneCtrl to ParentCtrl, you guessed it, we can use $emit.

Sunday, 8 November 2015

What is AngularJS ?

AngularJS is a JavaScript framework which simplifies binding JavaScript objects with HTML UI elements.

Let us understand this with a simple Example.

So if we analyze the above code (Control Binding In Plain Javascript) visually it looks something as shown below.

5Vlbc9o6EP41PKaDbS7mMdA0fTnTzuTMtH0UtrDVyBaVZS759ZGsFbZsTAzBzckJDyCt1quVvo+9wMBbJLt7jtbxPyzEdOAOw93A+zxwXd8fyncl2GvBeChnShBxEmqRUwoeyBMGITwX5STEmaUoGKOCrG1hwNIUB8KSIc7Z1lZbMWrvukaR2bEUPASINqU/SChiOJY7KeVfMYlis7MzmemVJQoeI87yFPYbuN6qeOnlBBlbcNDdUE89X8/3MB+NzE6p5dETY4kl4Dgrbw9OS+wLSdHG2pOS9NG+nyXjIeYVJe9OgssZk4bUKNktMFUAG/DGvjdbzoLVauIGsyme3mjTX7qqH+6X4xScfa1JAGCDaA7XoQWZ2BtUcShBhinjImYRSxG9K6XzAjmstpA4zGORUDl05BDviPgJYjX+pcafxmqWCr5XS4Wamui1qVrULqh9a7w6cW7QyVjOA3isoQNsEYhHuM1OcX64vHvMEixdU4zT6q4LFwbfUMebwtcHqBEdHjlY+c6I9Lq7CX0EeKqKZd2QVzPkj21D+pwNQ7ecI3Uko7ZWCllVQw4qhy9FBZk6EgsO1ROx+mIIOHmSIUU0azKEY4oE2dgOtdKiHYSOYLv6gjuTw9aXA+3B1fCGm7PwnlB5h/MVKxwrgZ/8yVWILBZudBy+lQruaL0rF+UoUp//7kSeYZ6iBBuD0jdtU2s0eFWyRlFlGxOBH9aowHwr867NpCxGIdvCJKIoU4Aotq0IpQtGmQ7wJh/JBwRnj7iyMixeB0c2mAsMKHSmZWvAqcM4hO/4tsyvjikb4mpuNWnrGAOt7/k5IEMir4CcE1lhLH+rauL/DIM7ruHgeE0czJVXcfD6gMFsfuUkrRMzpOlDXq4smTTdZwTukqMLnVdE4IsvHpyr8F9zX7CcfCz+m5jzNvwHo1dPNos8E9I//hEzzchUaP+NVOPAifrqTFr6DxMCm11Lr52JYfQlYe9QKUBWuLw1Gbk1E7NaR9G1NfH8Fwy9aWviHKtVr59PzbgkVl/saelI2sCAVuAMYrxooisxGkGmbuhsYrQ4PD2vXWrzq7d2yYFfqk5yMA3lrkXKCFS6IEFLDIPgVIax13Htku63kiTGR3KEkZ3XJL8Iqzz2RTSsVTM3k27h6SrAw1bvDviW7POXgPffP/DN5vncotXxjxWtc5KGJI3k+jdoxLsVr7J2VPJqhWoVnClLVZ6rVqcgQpRE6gf2QDJK/QA+V5Uokf8D3MJCQsKwSJLHSmImtVe0YHcs9bB8oJJMT1bKvfzCUvuJZXSk7D3G7As6Gzkt/x3QnCr/B/LungE=

And if we analyze the code (Control Binding In Angular1) visually it looks something as shown below.

7Vjvb9o8EP5rkLYP70QwpPQjUNZOWrVq7dp3H93YJFZNjIz51b++5+RMnIS2rC2lSEUIxefz2X6ex2cuDTIYL081nSTninHZaDXZskFOGq1Wt9uEX2tY5YZOE1rWEGvBclNQGC7FPUcjjotngvFpydEoJY2YlI2RSlMemZKNaq0WZbeRkuVZJzR2MxaGy4jKuvVGMJPgtlphYT/jIk7czEF4nPfc0ugu1mqW4nyNFhlln7x7TF0s3OiymTfd+BW2gzYaJjQtLeleqXHJoPm0gA+3K8qIpHRemlSK9K4M0K3SjGvPiQyBXa0UBLJP4+WAS8uwY69NmyN6G7Lu8YjBl/2Xh/6+rfsaYM1TXOxrQ6LC5lTOEI6rpfkzhW1l9qlZOXYzfriNEzRIf5EIwy8nNLK9C5Az2BIzltg9TShTC2zEkk4tcsBSH6fj2nCU/TabynxwR6dcjbnRK6uD3P0IGcJjE3SwvShEGDifxBOg86NIa7yOXCAIDwjiloCSGqC9NJ5JekiAEoIxPgSi7Rqig9nUQOBDgrRz/JFE2qlBWoOSp6xn7wRoRRYbEVnIDNWmbvZA5Uth/vee/1pMv3VsK4VV2y4LcdYo+vLZOavdL8/hDUtWM50R/ER2g1XH/LE42YGt8+bx4ijYRIvmkhoxL697E1c4w4USsKO1LNZ3N8qChBW68+3hKD+xVwO5gS6QC+wC5RjUAmXSWW/7ZWrC+30XanpCM48rbVdqwtT+pJqyZLUvNZFKkiHtF6qp7QZioJYL/A5qOnqhmjYkoUIoVhy2Z6eJZl+0B1W2XCHxr7QHHbwYXKDq5bND2ruHSPt+7w4Xx532Kltbn/YAM/geaMeC7bBo32uS71TKnVpu3pb28Gh/p939O/F4vznrXQ2vh78brVACYn0m5vAY28cv14Iv8HUJzNW8gPIdGLQFgG0OFPwzUFJy/dUNhgV542uSgj/21u4XAxDhjg+UVLagT1UKnv2RkLJiolLE9t1ClM9P+rZMEPAOpIcdY8GYnWZj9aHAeyQzKSfgx2FAv1yzvG+d16xIqY1Z2FPy+v2HL+UQT+mbFiUBbsjTxPWP4c0neZvJC8gjx9cjz/0x8LlzfL4td/Ui/fzXyfDnJ3mbyQvbz5PnKrpXkgfN4pVknruLt89k+AA=

Friday, 6 November 2015

Component in Angular2

In Angular 2, Components are the main way we build and specify elements and logic on the page.

In Angular 1, we achieved this through directives, controllers, and scope. In Angular 2, all those concepts are combined into Components.

To build an Angular 2 application you define a set of components, for every UI element, screen, and route. An application will always have a root component that contains all other components. In other words, every Angular 2 application will have a component tree, which may look like this:

5VhPb6M+EP00HHcFGGhybLtp9/KTVuphd48OTMCqwcg4f+inrw3jEIemza9VmkabQ5R5NmP7vWePiUduy829pHXxn8iAe6GfbTzywwvDycTX3wZoeyD2dWSAXLKsh4IBeGBPgCA+ly9ZBo3TUQnBFatdMBVVBalyMCqlWLvdFoK7o9Y0tyMOwENK+Rj9zTJV4LLCZMB/AssLO3KQTPuWOU0fcymWFY7nhWTRffrmktpcuNCNjxkSBFoEYkxY08qZ0pMQpQNIaAb6cLnMZaSiKyfmrHp0CZoLmYHcmRmZaXWlEDqR+VVuboEbha16YeKHizidJHQaTefz4Fs//btju28JllDhZD+aEh22onyJdFzXNWcpZYqJqm9sVGsl7kQCkyzwyM26YAoeapqa1rX2tMYKVXJsbgqaiTUGOaeNoU8rdYNjglSA3j9mZV0fXNY9iBKUbI0ZsPsEc+DmsdZYD04MrH+KHRfafhS1zbeZBxr1D2TySFbJiNU7xhXI5oIIDRKX0MAeT2dhNBoxOitrLlrQB97lcBr5X4nT+CCnl7Tvp7YG9DGx1fAslGKpu2xKoy9F6dWI0hGVUGXX5v6io9Rww1KXPU2EbP8Yxr7HNvyLBMKGqZ0mHZkW81Q/DGSjS89bxOq5iaXslHyl5CoqcziUpysgY4F2BIhf4N9iEjhVbOXO+yVRcIRfgukVDVvKamtPKbKna788fGr3trGf6MpNZE87m6enYJSns8h21e9zzeRfdE1XJM/lGhLt1bb90+BY15AYxTtkvxPaBt8fPmSbT7fGWWW3tWHv2v3/RT9Qcz5BdDvUaVR/7Rg5qSPeOCy6q8q5XBNt39xxdtE7fbO9QWMiW3E+bBsdDm/yfffhTxsyewY=

LET US SEE A SIMPLE COMPONENT

Thursday, 29 October 2015

AngularJS Providers

Provider Singleton Instantiable Configurable
Constant
Value
Service
Factory
Decorator
Provider

Constant

A constant can be injected everywhere. A constant can not be intercepted by a decorator, that means that the value of a constant should never be changed (though it is still possible to change it programmatically in Angular 1.x).

 angular.module('app', []);

 app.constant('MOVIE_TITLE', 'The Matrix');

 .controller('MyController', function (MOVIE_TITLE) {
   expect(MOVIE_TITLE).toEqual('The Matrix');
 });
    

Value

A value is nothing more than a simple injectable value. The value can be a string, number but also a function. Value differs from constant in that value can not be injected into configurations, but it can be intercepted by decorators.

 angular.module('app', []);

 .value('movieTitle', 'The Matrix');

 .controller('MyController', function (movieTitle) {
   expect(movieTitle).toEqual('The Matrix');
 })
    

Service

Use Service when you need just a simple object such as a Hash, for example {foo:1, bar:2} It's easy to code, but you cannot instantiate it. A service is an injectable constructor. If you want you can specify the dependencies that you need in the function. A service is a singleton and will only be created once by AngularJS. Services are a great way for communicating between controllers like sharing data.

 angular.module('app' ,[]);

 .service('movie', function () {
   this.title = 'The Matrix';
 });

 .controller('MyController', function (movie) {
   expect(movie.title).toEqual('The Matrix');
 });
    

Factory

A factory is an injectable function. A factory is a lot like a service in the sense that it is a singleton and dependencies can be specified in the function. The difference between a factory and a service is that a factory injects a plain function so AngularJS will call the function and a service injects a constructor. A constructor creates a new object so new is called on a service and with a factory you can let the function return anything you want. As you will see later on, a factory is a provider with only a $get method.

 angular.module('app', []);

 .factory('movie', function () {
   return {
     title: 'The Matrix';
   }
 });
 .controller('MyController', function (movie) {
   expect(movie.title).toEqual('The Matrix');
 });
 .factory('catalogueService', function($rootScope, $http) {
   // We first define a private API for our service.

   // Private vars.
   var items = [];

   // Private methods.
   function add( id ) {
     $http.put( $rootScope.apiURL, {id:id} )
     .success(function(data,status,headers,config) { items.push(data); })
     .then(function(response) { console.log(response.data); });
   }

   function store( obj ) {
     // do stuff
   }

   function remove( obj ) {
     // do stuff
   }

   // We now return a public API for our service.
   return {
     add: add,
     store: store,
     rm: remove
   };
 };
    

Decorator

A decorator can modify or encapsulate other providers. There is one exception and that a constant cannot be decorated.

 var app = angular.module('app', []);

 app.value('movieTitle', 'The Matrix');

 app.config(function ($provide) {
   $provide.decorator('movieTitle', function ($delegate) {
     return $delegate + ' - starring Keanu Reeves';
   });
 });

 app.controller('MyController', function (movieTitle) {
   expect(movieTitle).toEqual('The Matrix - starring Keanu Reeves');
 });
    

Provider

A provider is the most sophisticated method of all the providers. It allows you to have a complex creation function and configuration options. A provider is actually a configurable factory. The provider accepts an object or a constructor.

 var app = angular.module('app', []);

 app.provider('movie', function () {
   var version;
   return {
     setVersion: function (value) {
       version = value;
     },
     $get: function () {
       return {
           title: 'The Matrix' + ' ' + version
       }
     }
   }
 });

 app.config(function (movieProvider) {
   movieProvider.setVersion('Reloaded');
 });

 app.controller('MyController', function (movie) {
   expect(movie.title).toEqual('The Matrix Reloaded');
 });
    

Summary

  • All the providers are instantiated only once. That means that they are all singletons.
  • All the providers except constant can be decorated.
  • A constant is a value that can be injected everywhere. The value of a constant can never be changed.
  • A value is just a simple injectable value.
  • A service is an injectable constructor.
  • A factory is an injectable function.
  • A decorator can modify or encapsulate other providers except a constant.
  • A provider is a configurable factory.