Saturday, 27 February 2016

Comparing Angular 1 and Angular 2 Side by Side

Comparing Component and Controller

Angular 2

The Component

Controllers are a big part of Angular 1 that is going away in Angular 2. In Angular 2 you will probably write all your controllers as components.


  import {Component} from 'angular2/core'

  @Component({
    selector: 'my-app',
    providers: [],
    template: `
      <div>
        <h2>Hello {{name}}</h2>
      </div>
    `,
    directives: []
  })
  export class App {
    constructor() {
      this.name = 'Angular2'
    }
  }
                

    <my-app>
      loading...
    </my-app>
                

Angular 1

The Controller


var app = angular.module('app', []);

app.controller('MainCtrl', function($scope) {
  $scope.name = 'Hello Angular1';
});
                

  <body ng-controller="MainCtrl">
    <h2>{{name}}</h2>
  </body>
              

Structural Directives

Angular 2

*ngFor, *ngIf


    <ul>
      <li *ngFor="#ball of balls">
        {{ball.name}}
      </li>
    </ul>
    <div *ngIf="balls.length">
      <h3>You have {{balls.length}} balls</h3>
    </div>
            

Angular 1

ng-repeat, ng-if


    <ul>
      <li ng-repeat="ball in balls">
        {{ball.name}}
      </li>
    </ul>
    <div ng-if="balls.length">
      <h3>You have {{balls.length}} ball </h3>
    </div>
                

Two-Way Data Binding

Angular 2

[(ngModel)]='value'


    <input [(ngModel)]="me.name">
            

Angular 1

ng-model='value'


    <input ng-model="me.name">
                

Property Binding

Angular 2

[Property]='Property'


    <div [style.visibility]="tools ? 'visible' : 'hidden'">
      <img [src]="imagePath">
      <a [href]="link">{{tools}}</a>
    </div>
            

Angular 1

ng-property='Property'


    <div ng-style="tools ? {visibility: 'visible'}: {visibility: 'hidden'}">
        <img ng-src="{{tools}}">
        <a ng-href="{{tools}}">
          {{tools}}
        </a>
    </div>
                

Event Binding

Angular 2

(event)='action()'


    <input
      (blur)="log('blur')"
      (focus)="log('focus')"
      (keydown)="log('keydown', $event)"
      (keyup)="log('keyup', $event)"
      (keypress)="log('keypress', $event)"
      >
                

Angular 1

ng-event='action()'


        <input
          ng-blur="log('blur')"
          ng-focus="log('focus')"
          ng-keydown="log('keydown', $event)"
          ng-keyup="log('keyup', $event)"
          ng-keypress="log('keypress', $event)"
          >
            

Services and DI

Angular 2

Injectable Service

In Angular 1 we use services by using any one of Factory, Services, Providers, Constants, Values which all are covered under a provider.

But in Angular 2 all this are consolidated into one base Class.


  import {Injectable} from 'angular2/core';
  
  @Injectable()
  export class StudentService {
    getStudents = () => [
      { id: 1, name: 'Nisar' },
      { id: 2, name: 'Sonu' },
      { id: 3, name: 'Ram' }
    ];
  }
            

Using same service in Component


  import { Component } from 'angular2/core';
  import { StudentService } from './student.service';
  
  @Component({
    selector: 'my-students',
    templateUrl: 'app/student.component.html',
    providers: [StudentService]
  })
  export class StudentsComponent {
    constructor(
      private _StudentService: StudentService) { }
    students = this._StudentService.getStudents();
  }
            

Angular 1

Service


  (function () {
    angular
      .module('app')
      .service('StudentService', StudentService);

    function StudentService() {
      this.getStudents = function () {
        return [
          { id: 1, name: 'X-Wing Fighter' },
          { id: 2, name: 'Tie Fighter' },
          { id: 3, name: 'Y-Wing Fighter' }
        ];
      }
    }
  })();
            

Using same service in Controller


  (function () {
    angular
      .module('app', [])
      .controller('StdController', StudentsController);
  
    StudentsController.$inject = ['StudentService'];
    function StdController(StudentService) {
      var std = this;
      std.title = 'Services';
      std.Students = StudentService.getStudents();
    }
  })();
            

Wednesday, 24 February 2016

SASS Cheat Sheet


Nesting

SCSS

 h1
 {
   color: blue;
   span
   {
     color: gray;
   }
 }
                

CSS

 h1 {
   color: blue;
 }
 h1 span {
   color: gray;
 }
                

Parent selector

SCSS

input{
  border-color: gray;
  &:focus
  {
    border-color: orange;
  }
}
       

CSS

  input {
  border-color: gray;
}
input:focus {
  border-color: orange;
}
                

Parent selector

SCSS

.advert button
{
  font-size: 100%;
  .billboard @
  {
    font-size: 200%;
  }
}
                

CSS

.advert button {
  font-size: 100%;
}
.billboard .advert button {
  font-size: 200%;
}
             

$ variables

SCSS

                  
$color-main: rgb( 240, 139, 29 );
$color-accent: rgb( 141, 198, 63 );
h1
{
  color: $color-main;
  span
  {
    color: $color-accent;
  }
}
               

CSS

h1 {
  color: #f08b1d;
}
h1
span {
  color: #8dc63f;
}
               

Color helpers

SCSS

$main-color: rgb( 240, 139, 29 );
$main-color-light: lighten( $main-color, 30% );
$main-color-dark: darken( $main-color, 30% );
h1
{
  color: $color-main;
  span
  {
    color: $main-color-light;
  }
  span
  {
   color: $main-color-dark;
  }
}
               

CSS

 
h1 {
  color: #f08b1d;
}
h1
span {
  color: #fad5ac;
}
h1
span {
  color: #6d3c07;
}
               

@mixin and @include

SCSS

@mixin section-style
{
  background-color: white;
  border-radius: 4px;
  box-shadow: 0 1px 3px rgba( 0, 0, 0, .7 );
}
div
{
  @include section-style;
  color:#rgb( 51, 51, 51 );
}
               

CSS

 div {
 background-color: white;
 border-radius: 4px;
 box-shadow: 0 1px 3px rgba( 0, 0, 0, .7 );
 color:#rgb( 51, 51, 51 );
 }
               

Mixin variables

SCSS

@mixin border-radius( $radius )
{
  -webkit-border-radius: $radius;
     -moz-border-radius: $radius;
          border-radius: $radius;
}
div
{
  @include border-radius( 4px );
}
               

CSS

 div {
  -webkit-border-radius: 4px;
  -moz-border-radius: 4px;
  border-radius: 4px;
}
               

Mixin variable defaults

SCSS

 @mixin border-radius( $radius:10px )
{
  -webkit-border-radius: $radius;
     -moz-border-radius: $radius;
          border-radius: $radius;
}
div
{
  @include border-radius( 4px );
}
section
{
  // no value here so default will be applied
  @include border-radius; 
}
               

CSS

div {
  -webkit-border-radius: 4px;
     -moz-border-radius: 4px;
          border-radius: 4px;
}
section {
  -webkit-border-radius: 10px;
     -moz-border-radius: 10px;
          border-radius: 10px;
}
               

Mixins multiple variables

SCSS

@mixin box-shadow( $x:0, $y:0, $blur:4px, $spread:0, $color:black )
{
  -webkit-box-shadow: $x $y $blur $spread $color;
     -moz-box-shadow: $x $y $blur $spread $color;
          box-shadow: $x $y $blur $spread $color;
}
div
{
  @include box-shadow( 0, 1, 10px, 0, rgba( 0, 0, 0, .7 ) );
}
section
{
  @include box-shadow( $blur:12px, $color:rgba( 0, 0, 0, .8 ) );
}
               

CSS

 div {
  -webkit-box-shadow: 0 1 10px 0 rgba(0, 0, 0, 0.7);
  -moz-box-shadow: 0 1 10px 0 rgba(0, 0, 0, 0.7);
  box-shadow: 0 1 10px 0 rgba(0, 0, 0, 0.7);
}
section {
  -webkit-box-shadow: 0 0 12px 0 rgba(0, 0, 0, 0.8);
  -moz-box-shadow: 0 0 12px 0 rgba(0, 0, 0, 0.8);
  box-shadow: 0 0 12px 0 rgba(0, 0, 0, 0.8);
}
               

Nested mixins

SCSS

@mixin border-radius( $radius:4px )
{
  -webkit-border-radius: $radius;
     -moz-border-radius: $radius;
          border-radius: $radius;
}
@mixin box-shadow( $x:0, $y:0, $blur:4px, $spread:0, $color:black )
{
  -webkit-box-shadow: $x $y $blur $spread $color;
     -moz-box-shadow: $x $y $blur $spread $color;
          box-shadow: $x $y $blur $spread $color;
}
@mixin div-style
{
  background-color:white;
  @include border-radius( 6px );
  @include box-shadow( $x:2, $blur:10px );
  color:rgb( 51, 51, 51 );
}
div
{
  @include div-style
}
               

CSS

div {
  background-color: white;
  -webkit-border-radius: 6px;
  -moz-border-radius: 6px;
  border-radius: 6px;
  -webkit-box-shadow: 2 0 10px 0 black;
  -moz-box-shadow: 2 0 10px 0 black;
  box-shadow: 2 0 10px 0 black;
  color: #333333;
}
               

@extend

SCSS

                    
div
{
  background-color: white;
  border:1px solid gray;
  margin-bottom: 1rem;
}
section
{
  @extend div;
  color: rgb( 102, 102, 102 );
}
               

CSS

div, section {
  background-color: white;
  border:1px solid gray;
  margin-bottom: 1rem;
}
section {
  color: #666666;
}
               

Extending with %placeholders

SCSS

%default-text
{
  font: {
    size: 100%;
    family: Georgia, "Times New Roman", serif;
    weight: normal;
  }
  line-height: 1.3;
  color: rgb( 51, 51, 51 );
}
div
{
  @extend %default-text;
}
section
{
  @extend %default-text;
}
header
{
  @extend %default-text;
}
aside
{
  @extend %default-text;
}
               

CSS

                    
div, section, header ,aside {
  font-size: 100%;
  font-family: Georgia, "Times New Roman", serif;
  font-weight: normal;
  line-height: 1.3;
  color: rgb( 51, 51, 51 );
}
               

Nesting namespaced

SCSS

h1
{
  font:
  {
    family: Georgia, "Times New Roman", serif;
    size: 137.5%;
    weight: thin;
  }
  color: blue;
}
               

CSS

h1 {
  font-family: Georgia, "Times New Roman", serif;
  font-size: 137.5%;
  font-weight :thin;
  color: blue;
}
               

Expanded

SCSS

 sass --watch --style expanded style.scss:style.css
               

CSS

ul {
  display: inline-block;
}
ul li {
  list-style: none;
  color: rgb(51,51,51);
}
               

Compact

SCSS

 sass --watch --style compact style.scss:style.css
               

CSS

ul { display: inline-block; }
ul li { list-style: none; color: rgb(51,51,51); }
               

Compressed

SCSS

sass --watch --style compressed style.scss:style.css
               

CSS

ul{display:inline-block;}ul li{list-style:none;color:rgb(51,51,51);}
               

Browser Sync with GULP


A JavaScript task runner has become a main stay for almost any new project. Some people think that runners like Grunt and Gulp are limited to only Node.js projects, but it's not so. Any project can benefit from a simple task runner. I’ve started using Gulp to do tasks in .Net projects. When it comes to building CSS and JavaScript, specifically, it’s bliss.

I want to share some tricks which will definetly make your's life easier. In this article i am going to explain how to use Browser Sync with gulp.

Install Packages

Initialize npm in your project


  npm init
 

Install following Package


  npm install -g gulp
 

  npm install gulp gulp-sass browser-sync --save-dev
 

Create File Structure

Create Gulpfile

Extras

You can download full source from my github

Sunday, 21 February 2016

Gulp with Sass

A JavaScript task runner has become a main stay for almost any new project. Some people think that runners like Grunt and Gulp are limited to only Node.js projects, but it's not so. Any project can benefit from a simple task runner. I’ve started using Gulp to do tasks in .Net projects. When it comes to building CSS and JavaScript, specifically, it’s bliss.

I want to share some tricks which will definetly make your's life easier. In this article i am going to explain how to use CSS Compilation for SASS.

Autoprefixer might be newer for use so let us have quick understanding

Autoprefixer parses CSS files and adds vendor prefixes to CSS rules using the Can I Use database to determine which prefixes are needed.

It's converts From
 a {
   transition: transform 1s
 }
To
 a {
   -webkit-transition: -webkit-transform 1s;
   transition: -ms-transform 1s;
   transition: transform 1s
 }

Install Packages

Initialize npm in your project


  npm init
 

Install following Package


  npm install -g gulp
 

  npm install gulp gulp-util gulp-sass gulp-autoprefixer del gulp-plumber  --save-dev
 

Create GulpConfig file

Create Gulpfile

Extras

You can download full source from my github

Saturday, 20 February 2016

ESLint using GULP


A JavaScript task runner has become a main stay for almost any new project. Some people think that runners like Grunt and Gulp are limited to only Node.js projects, but it's not so. Any project can benefit from a simple task runner. I’ve started using Gulp to do tasks in .Net projects. When it comes to building CSS and JavaScript, specifically, it’s bliss.

I want to share some tricks which will definetly make your's life easier. In this article i am going to explain how to use ESLint and find any error in javascript.

Install Packages

Initialize npm in your project


 npm init
 

Install following Package


 npm install -g gulp
 

 npm install gulp gulp-eslint gulp-util --save-dev
 

Create Gulp Config File

Create Gulpfile

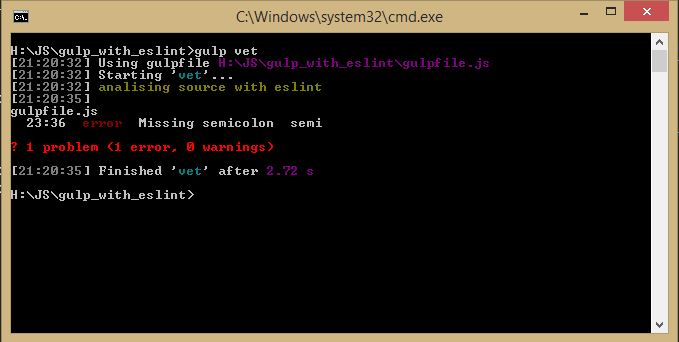
Run Gulp

We can now do gulp vet from the command line to execute this task.

Extras

You can download full source from my github

Thursday, 18 February 2016

JSLint Vs JSHint Vs JSCS Vs ESLint


This are four tools work in the same basic way. They are use to analyze and report problems in JavaScript and helpful in debugging JavaScript.
JSLint JSHint JSCS ESLint
It's oldest. The downsides are that JSLint is not configurable or extensible. You can’t disable many features at all. JSHint was created as a more configurable version of JSLint (of which it is a fork). JSCS is a code style checker. This means it only catches issues related to code formatting, and not potential bugs or errors. ESLint is the most recent out of the four. It was designed to be easily extensible, comes with a large number of custom rules, and it’s easy to install more in the form of plugins.

My choice of these four is ESLint. Because it support ES6.

A linting tool is a good step towards catching problems, but it only sees as many errors as its rules permit. For a more foolproof automated bug-catcher, I recommend using unit tests. Code reviews can also be useful for this purpose.

How do you and your team ensure the quality of your code?

Sunday, 14 February 2016

Directives in angular 2

Directives are classes which get instantiated as a response to a particular DOM structure. We use Directives to break complex problems into smaller more reusable components.

There are three kinds of Angular directives:

  1. Components
  2. Attribute directives
  3. Structural directives

Component

The Component is really a directive with a template. It's the most common of the three directives and we write lots of them as we build our application.

Components are typically used to create UI widgets or to break up the application into smaller components.

Attribute directives

The Attribute directive changes the appearance or behavior of an element. The built-in NgStyle directive, for example, can change several element styles at the same time.

Structural directive

The Structural directive changes the DOM layout by adding and removing DOM elements. NgFor and NgIf are two familiar examples.